Appearance
ROS2基础教程 - 14 Xacro
在前面使用 URDF 定义机器人模型的时候,存在如下问题:
- 相似的组件(如多个轮子、关节或传感器)时,必须多次编写相同的 XML 代码,导致重复和代码臃肿;
- URDF 中无法将模型中的组件尺寸使用参数化定义,导致每次需要修改时,都需要手动更改代码中的所有的硬编码值,不易于维护;
- URDF 不容易将常见的部分抽象为模块进行重用。整个模型通常需要在一个文件中维护,这使得重用模型组件变得困难。
基于上面的问题,可以使用 Xacro 来解决,它是 urdf 的增强,Xacro 使用 .xacro 扩展名的 XML 文件,与 URDF 文件的语法类似,但引入宏、参数、逻辑控制和模块化的特性,解决了 URDF 中代码冗余、缺乏参数化和可维护性差等问题,使得创建、管理和扩展机器人模型变得更加高效和灵活。
下面就来学习一下,如何使用 Xacro 优化 URDF 文件。
14.1 准备
首先新建一个新的功能包,在新的功能包中完成。
1 新建功能包
shell
ros2 pkg create --build-type ament_python xacro_python功能包的名字 xacro_python 。
2 安装xacro
shell
sudo apt install ros-humble-xacro # 我的是humble版本14.2 参数
使用 <xacro:property> 标签定义参数,在其他的地方使用 ${} 使用参数。
举个栗子:
首先在 功能包/urdf 目录下(没有就创建)创建一个 my_robot.xacro 文件,然后编写内容如下:
xml
<?xml version="1.0"?>
<robot xmlns:xacro="http://www.ros.org/wiki/xacro" name="my_robot">

  <!-- 定义参数 -->
  <xacro:property name="wheel_radius" value="0.04" />
  <xacro:property name="wheel_width" value="0.03" />

  <!-- 使用参数 -->
  <link name="wheel">
    <visual>
      <geometry>
        <cylinder radius="${wheel_radius}" length="${wheel_width}" />
      </geometry>
      <material name="yello_color">
        <color rgba="1 1 0 1"/>
      </material>
    </visual>
  </link>
</robot><robot>标签需要添加xmlns:xacro="http://www.ros.org/wiki/xacro"命令空间;- 上面使用
<xacro:property>标签定义参数,使用${}使用参数,${}中可以进行多个参数的+、-、*、/、%运算。
14.3 宏定义
使用 <xacro:macro> 标签定义宏,定义宏也就相当于定义一个模板组件,然后可以通过 <xacro:xxxxxx> 多次调用组件,生成多个相同的组件。
举个栗子:
可以定义一个轮子的宏,然后多次调用这个宏,生成 4 个轮子,可以根据不同的参数,进行不同的设置。
xml
<?xml version="1.0"?>
<robot xmlns:xacro="http://www.ros.org/wiki/xacro" name="my_robot">

  <!-- 定义参数 -->
  <xacro:property name="wheel_radius" value="0.04" />
  <xacro:property name="wheel_width" value="0.03" />

  <!-- 定义宏 -->
  <xacro:macro name="wheel" params="wheel_name radius length">
    <link name="${wheel_name}_link">
      <visual>
        <geometry>
          <cylinder radius="${radius}" length="${length}" />
        </geometry>
        <material name="yello_color">
          <color rgba="1 1 0 1"/>
        </material>
      </visual>
    </link>
  </xacro:macro>

  <!-- 使用宏,生成4个轮子 -->
  <xacro:wheel wheel_name="front_left_wheel" radius="${wheel_radius}" length="${wheel_width}" />
  <xacro:wheel wheel_name="front_right_wheel" radius="${wheel_radius}" length="${wheel_width}" />
  <xacro:wheel wheel_name="back_left_wheel" radius="${wheel_radius}" length="${wheel_width}" />
  <xacro:wheel wheel_name="back_right_wheel" radius="${wheel_radius}" length="${wheel_width}" />

</robot>
上面首先使用 <xacro:macro>,并定义宏的名称和参数,就想方法一样。然后多次使用宏,并传递参数,就像调用方法一样,会生成多个组件。
14.4 文件包含
<xacro:include> 标签用于引入其他 Xacro 文件,这样机器人模型可以被分解为多个独立的文件可以实现模块化和代码服用,提高可读性和维护性。
举个栗子:
首先定义一个 xacro 文件,然后在另一个文件中包含:
xml
<!-- 在被包含的 xacro 文件中也可以使用该参数 -->
<xacro:property name="wheel_radius" value="0.15" />

<!-- 包含另一个xacro文件 -->
<xacro:include filename="wheel.xacro" />

<!-- 可以根据功能包查找 -->
<xacro:include filename="$(find robot_model)/urdf/wheel.xacro" />
14.5 转换Xacro文件为URDF
Xacro 文件最终需要转换为 URDF 文件才能被 ROS 2 的大多数工具(如 RViz、Gazebo 等)直接使用。ROS 2 提供了xacro命令行工具来进行这种转换。例如,在终端中使用以下命令将 Xacro 文件转换为 URDF 文件:
shell
xacro my_robot.xacro > my_robot.urdf上面的命令会将使用 my_robot.xacro 生成 URDF 内容到 my_robot.urdf 文件中,然后就可以使用 URDF 文件了。
例如上面定义和使用参数的 xacro 代码,生成 urdf 内容如下:
xml
<?xml version="1.0" ?>
<!-- =================================================================================== -->
<!-- |    This document was autogenerated by xacro from my_robot.xacro                 | -->
<!-- |    EDITING THIS FILE BY HAND IS NOT RECOMMENDED                                 | -->
<!-- =================================================================================== -->
<robot name="my_robot">
  <!-- 使用参数 -->
  <link name="wheel">
    <visual>
      <geometry>
        <cylinder length="0.03" radius="0.04"/>
      </geometry>
      <material name="yello_color">
        <color rgba="1 1 0 1"/>
      </material>
    </visual>
  </link>
</robot>
14.6 在Launch文件中使用Xacro
1 新建launch文件
首先在 功能包/launch 下新建 my_robot_launch.py :
python
from launch import LaunchDescription
from launch_ros.actions import Node
from ament_index_python.packages import get_package_share_directory
import os
import xacro

def generate_launch_description():

    # 获取xacro_python功能报下的urdf目录下的my_robot.xacro
    xacro_path = os.path.join(
        get_package_share_directory('xacro_python'),
        'urdf',
        'my_robot.xacro'
    )

    # 解析 Xacro 文件为urdf
    robot_description_config = xacro.process_file(xacro_path)
    robot_description = {'robot_description': robot_description_config.toxml()}

    robot_state_publisher = Node(
        package='robot_state_publisher',
        executable='robot_state_publisher',
        parameters=[robot_description]
    )

    joint_state_publisher = Node(
        package='joint_state_publisher',
        executable='joint_state_publisher',
        name='joint_state_publisher',
        parameters=[robot_description]
    )

    rviz = Node(
        package='rviz2',
        executable='rviz2',
        name='rviz2',
        output='screen'
    )

    return LaunchDescription([
        robot_state_publisher,
        joint_state_publisher,
        rviz
    ])
2 配置launch文件(重要)
在 setup.py 中新增 launch 相关配置:
python
from setuptools import find_packages, setup
import os
from glob import glob

package_name = 'robot_model'

setup(
    # ...其他配置
    data_files=[
        # ...其他配置

        (os.path.join('share', package_name, 'launch'), glob(os.path.join('launch', '*_launch.py'))),
        (os.path.join('share', package_name, 'config'), glob(os.path.join('config','*.*'))),
        (os.path.join('share', package_name, 'rviz'), glob(os.path.join('rviz', '*.*'))),
        (os.path.join('share', package_name, 'urdf'), glob(os.path.join('urdf', '*.*'))),  # urdf
    ],
    # ...其他配置
)
上面新增了三行配置,主要作用是安装 launch、config、rviz、urdf 目录中的文件到编译的 install 目录中,这样在运行的时候,能找到这些目录下的文件。(否则运行launch文件找不到)
注意,后面使用了通配符进行了文件的匹配,你需要按照规则命令launch文件,我这里launch文件需要以 _launch.py 结尾。
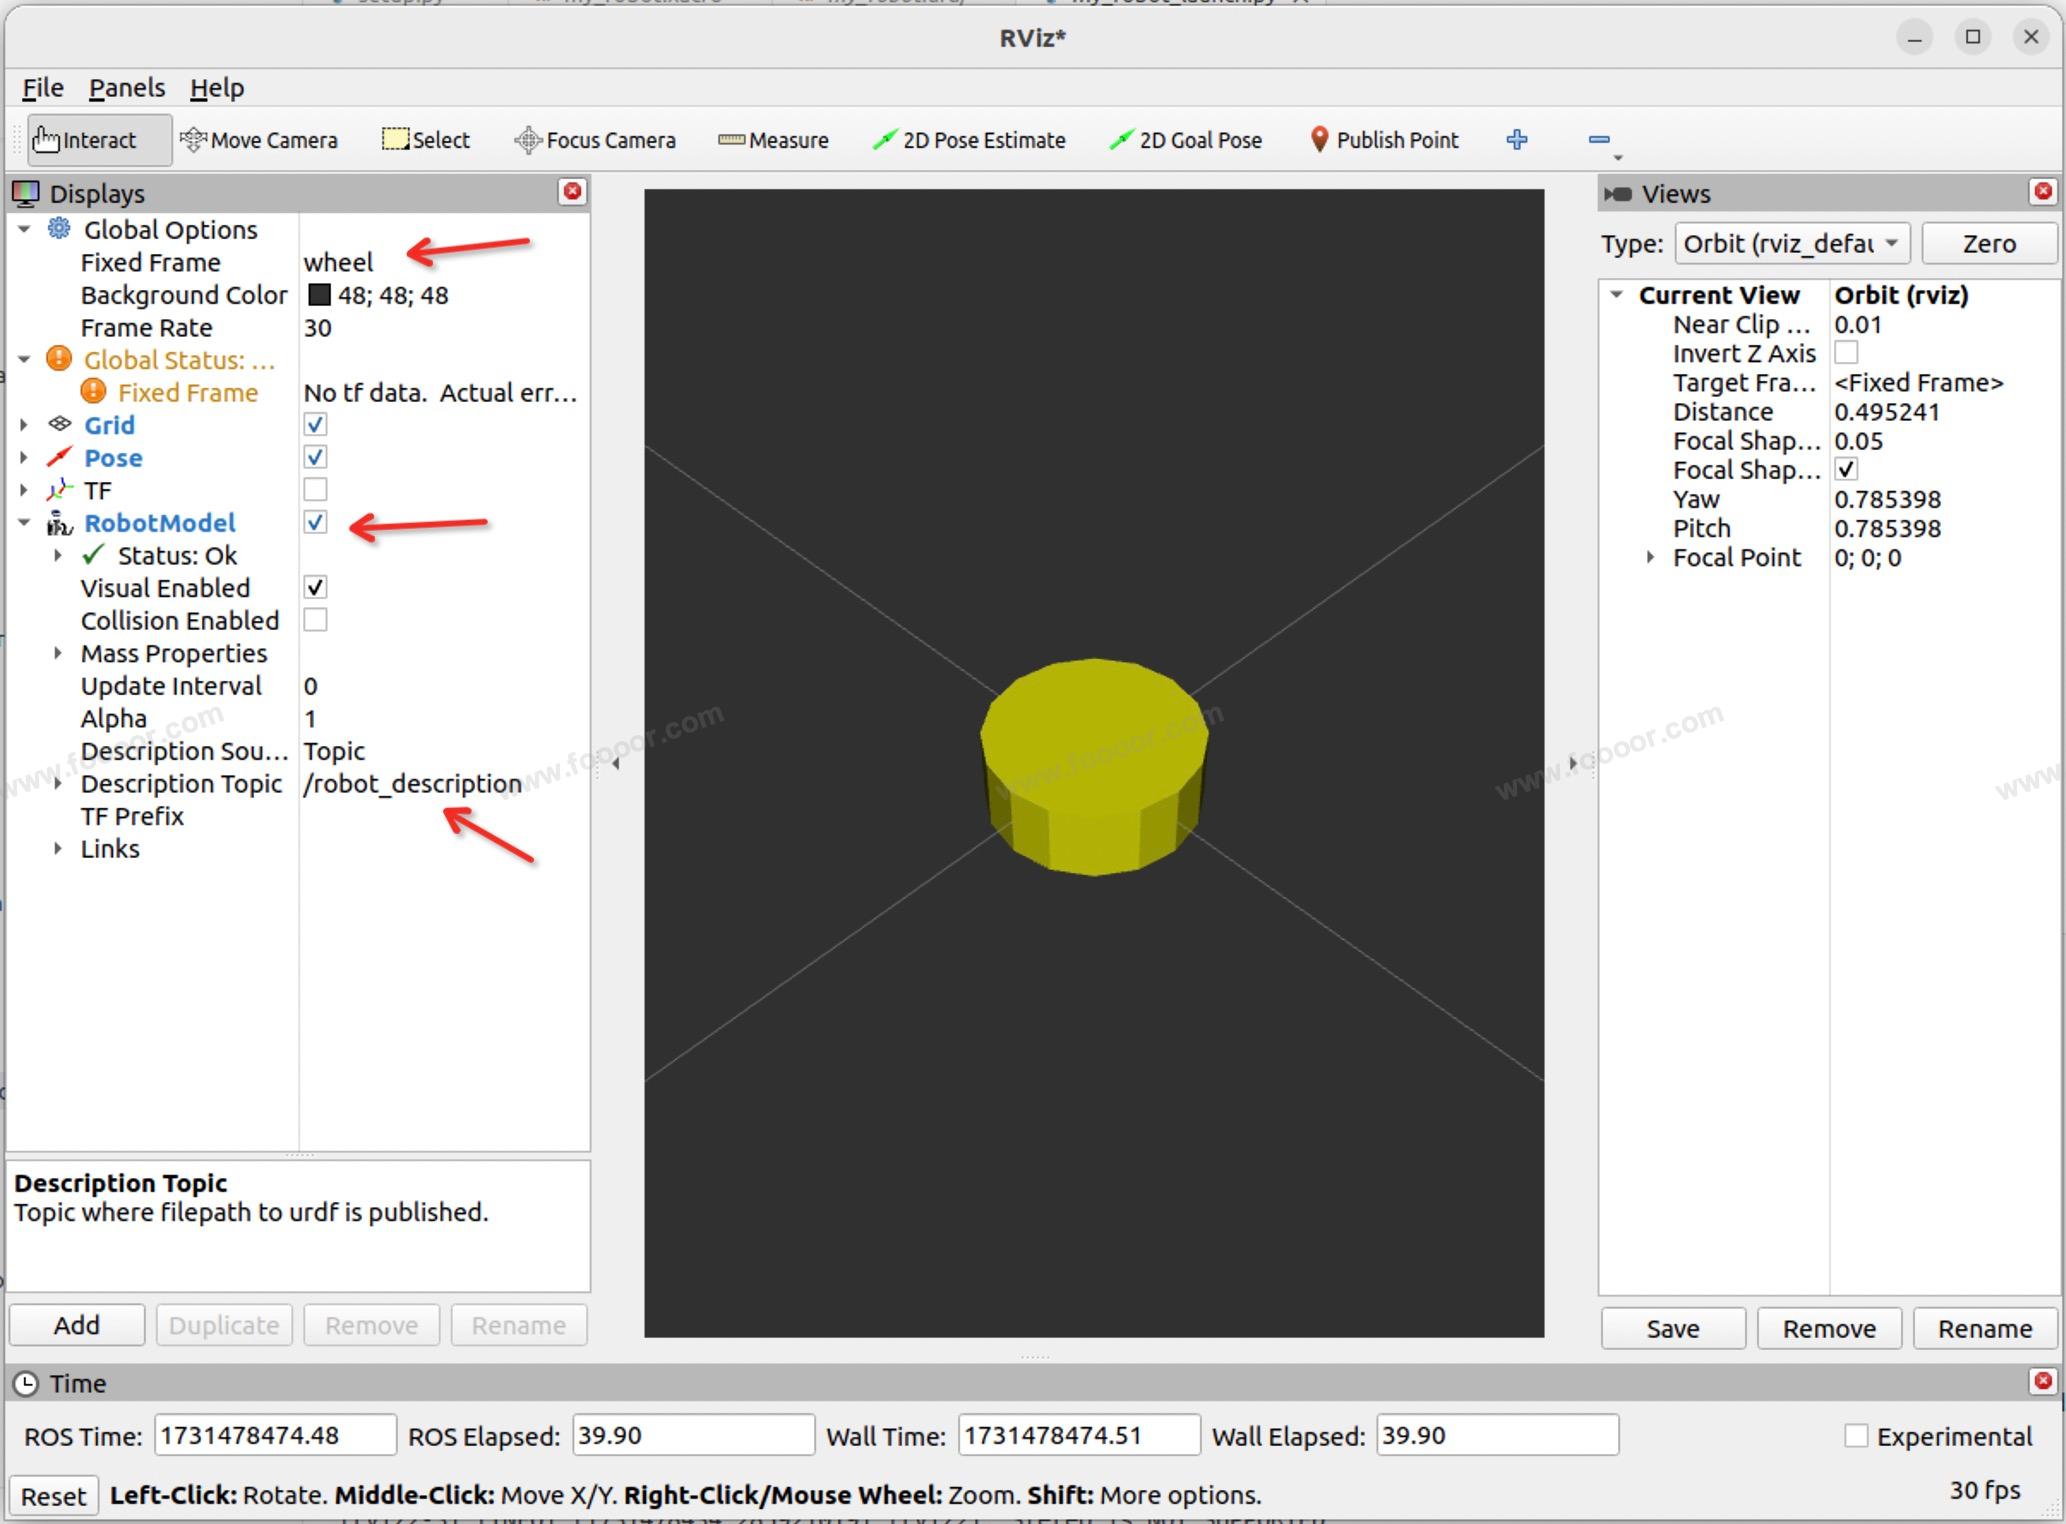
3 启动和查看
有了 launch 文件就可以启动和查看了。
我这里的 xacro 内容还是定义参数的内容,所以只显示了一个轮子。
14.7 使用xacro定义机器人
将在 urdf 章节定义的机器人,下面使用 xacro 进行优化,内容如下:
xml
<?xml version="1.0" ?>
<robot xmlns:xacro="http://www.ros.org/wiki/xacro" name="robot">
<!-- 定义参数 -->
<xacro:property name="PI" value="3.1415926" />
<!-- 车体半径 -->
<xacro:property name="base_radius" value="0.14" />
<!-- 车体高度 -->
<xacro:property name="base_height" value="0.12" />
<!-- 驱动轮参数,辅助轮半径根据离地高度计算 -->
<xacro:property name="wheel_radius" value="0.04" />
<xacro:property name="wheel_width" value="0.03" />
<!-- 雷达支架半径 -->
<xacro:property name="laser_bracket_radius" value="0.01" />
<!-- 雷达支架高度 -->
<xacro:property name="laser_bracket_height" value="0.1" />
<!-- 雷达半径 -->
<xacro:property name="laser_radius" value="0.03" />
<!-- 雷达高度 -->
<xacro:property name="laser_height" value="0.05" />
<!-- 摄像头长 -->
<xacro:property name="camera_length" value="0.05" />
<!-- 摄像头宽 -->
<xacro:property name="camera_width" value="0.02" />
<!-- 摄像头高 -->
<xacro:property name="camera_height" value="0.02" />
<material name="yellow_color">
<color rgba="1 1 0 1"/>
</material>
<!-- base_footprint -->
<link name="base_footprint">
<visual>
<geometry>
<sphere radius="0.001"/>
</geometry>
</visual>
</link>
<!-- 底盘 -->
<link name="base_link">
<visual>
<geometry>
<cylinder radius="${base_radius}" length="${base_height}"/>
</geometry>
<origin rpy="0 0 0" xyz="0 0 0"/>
<material name="black_color">
<color rgba="0 0 0 1"/>
</material>
</visual>
</link>
<joint name="base_link2base_footprint" type="fixed">
<parent link="base_footprint"/>
<child link="base_link"/>
<origin xyz="0 0 0.1"/>
</joint>
<!-- 定义驱动轮 -->
<xacro:macro name="drive_wheel" params="name flag">
<link name="${name}_wheel">
<visual>
<geometry>
<cylinder radius="${wheel_radius}" length="${wheel_width}" />
</geometry>
<origin rpy="0 0 0" xyz="0 0 0"/>
<material name="yellow_color" />
</visual>
</link>
<joint name="${name}_wheel2base_link" type="continuous">
<parent link="base_link"/>
<child link="${name}_wheel"/>
<origin xyz="0 ${(base_radius + wheel_width / 2) * flag} ${base_height/2 * -1}" rpy='${PI/2*flag} 0 0' />
</joint>
</xacro:macro>
<!-- 右轮 -->
<xacro:drive_wheel name="right" flag="-1" />
<!-- 左轮 -->
<xacro:drive_wheel name="left" flag="1" />
<!-- 定义辅助轮 -->
<xacro:macro name="assist_wheel" params="name flag">
<link name="${name}_wheel">
<visual>
<geometry>
<sphere radius="${wheel_radius / 2}"/>
</geometry>
<origin rpy="0 0 0" xyz="0 0 0"/>
<material name="yellow_color" />
</visual>
</link>
<joint name="${name}_wheel2base_link" type="continuous">
<parent link="base_link"/>
<child link="${name}_wheel"/>
<origin xyz="${(base_radius - wheel_radius / 2) * flag} 0 ${(base_height / 2 + wheel_radius / 2) * -1}"/>
</joint>
</xacro:macro>
<!-- 前辅助轮 -->
<xacro:assist_wheel name="front" flag="1" />
<!-- 后辅助轮 -->
<xacro:assist_wheel name="back" flag="-1" />
<!-- 雷达支架 -->
<link name="laser_bracket_link">
<visual>
<geometry>
<cylinder length="${laser_bracket_height}" radius="${laser_bracket_radius}"/>
</geometry>
<origin rpy="0 0 0" xyz="0 0 0"/>
<material name="gray_color">
<color rgba="0.5 0.5 0.5 1"/>
</material>
</visual>
</link>
<joint name="laser_bracket_link2base_link" type="fixed">
<parent link="base_link"/>
<child link="laser_bracket_link"/>
<origin xyz="0 0 ${base_height / 2 + laser_bracket_height / 2}"/>
</joint>
<!-- 雷达 -->
<link name="laser_link">
<visual>
<geometry>
<cylinder length="${laser_height}" radius="${laser_radius}"/>
</geometry>
<origin rpy="0 0 0" xyz="0 0 0"/>
<material name="red_color">
<color rgba="1 0 0 1"/>
</material>
</visual>
</link>
<joint name="laser_link2laser_bracket_link" type="fixed">
<parent link="laser_bracket_link"/>
<child link="laser_link"/>
<origin xyz="0 0 ${laser_bracket_height / 2 + laser_height / 2}"/>
</joint>
<!-- 摄像头 -->
<link name="camera_link">
<visual>
<geometry>
<box size="${camera_width} ${camera_length} ${camera_height}"/>
</geometry>
<origin rpy="0 0 0" xyz="0 0 0"/>
<material name="green_color">
<color rgba="0 1 0 1"/>
</material>
</visual>
</link>
<joint name="camera_link2base_link" type="fixed">
<parent link="base_link"/>
<child link="camera_link"/>
<origin xyz="${base_radius - camera_width / 2} 0 ${base_height / 2 + camera_height / 2}"/>
</joint>
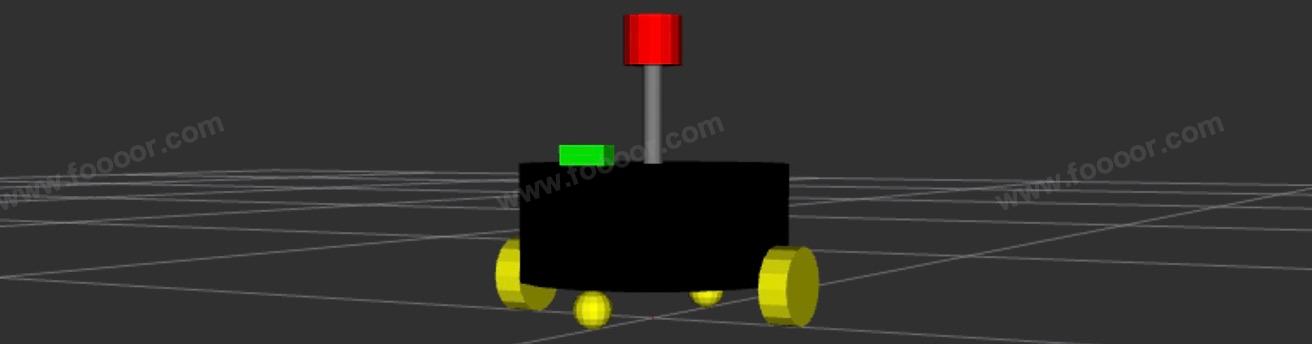
</robot>上面的 xacro 在之前的 urdf 基础上,提取出关键的参数,并将轮子定义为模板进行重用。
然后可以使用上面 Launch 的方式使用 Xacro,并打开 rviz 查看机器人模型: