Appearance
Flutter教程 - 7 Dialog和Toast
在开发 App 的时候,各种弹出窗口和提示内容是必不可少的,下面就来学习一下 Flutter 中常用的一些弹出窗口和提示展示的 Toast。
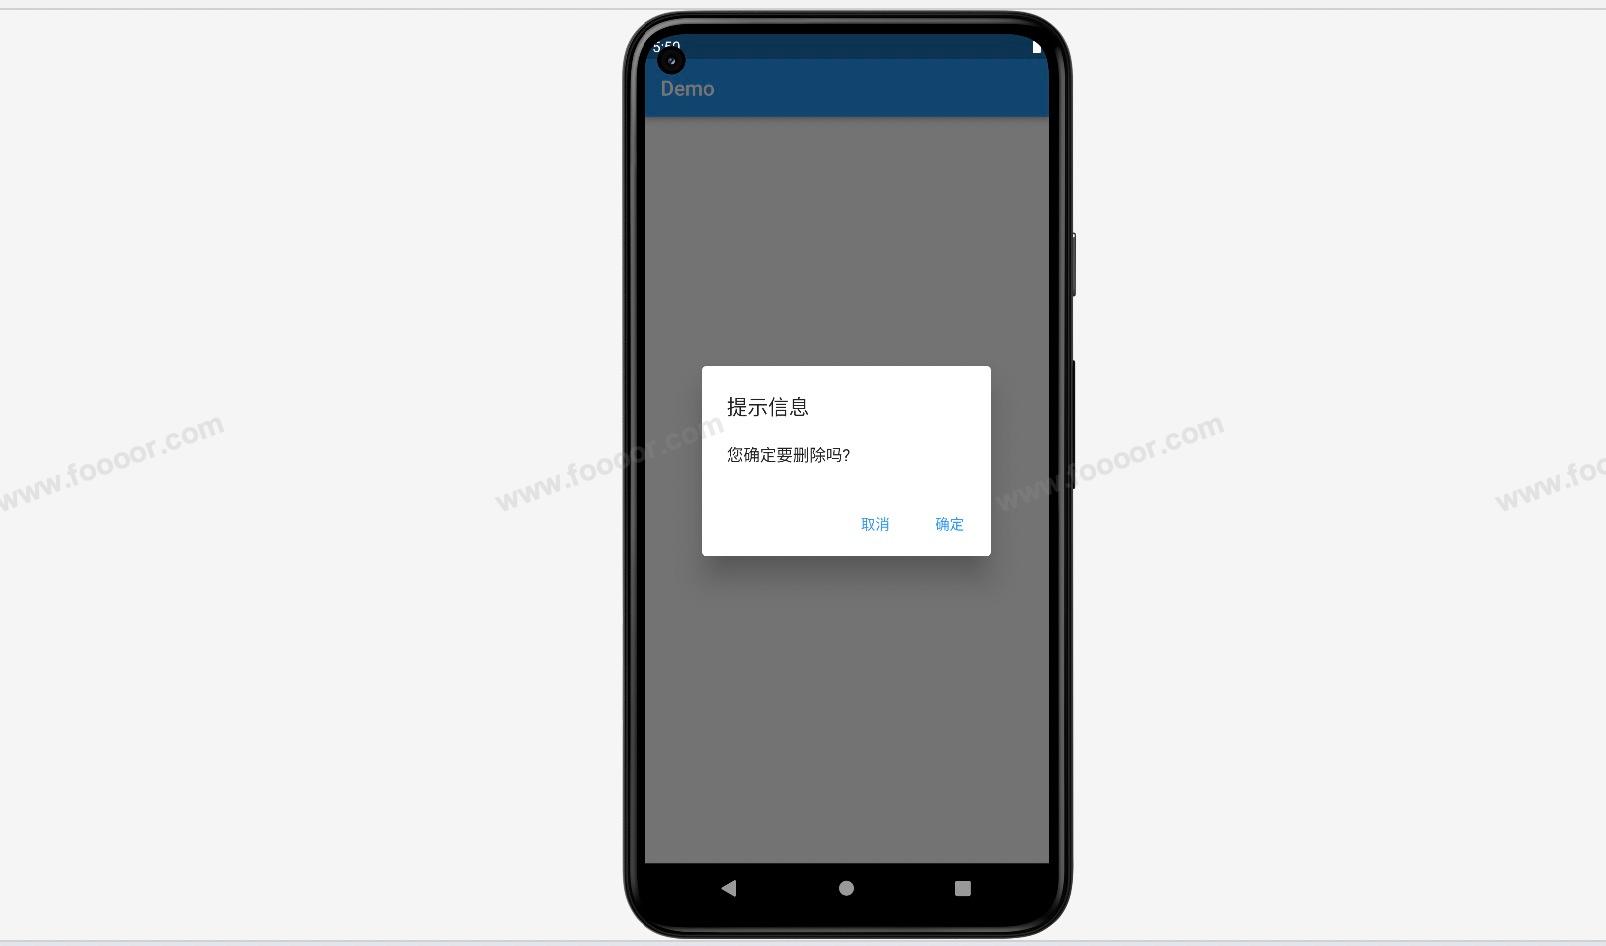
7.1 AlertDialog
显示效果如下:
实现代码如下:
在上面的实现中,是先在页面中添加了一个 ElevatedButton 按钮,然后点击按钮,触发 AlertDialog 的显示。
dart
import 'package:flutter/material.dart';

void main() => runApp(const MyApp());

/// App根Widget
class MyApp extends StatelessWidget {
  const MyApp({super.key});

  @override
  Widget build(BuildContext context) {
    return const MaterialApp(
      debugShowCheckedModeBanner: false,
      home: DemoPage(),
    );
  }
}

/// 页面
class DemoPage extends StatelessWidget {
  const DemoPage({super.key});

  @override
  Widget build(BuildContext context) {
    return Scaffold(
      appBar: AppBar(
        title: const Text('Demo'),
      ),
      body: Center(
        child: ElevatedButton(
            onPressed: () {
              // -------------通过showDialog显示AlertDialog----------------
              showDialog(
                  barrierDismissible: false, //表示点击灰色背景的时候是否消失弹出框
                  context: context,
                  builder: (context) {
                    // ---- 返回一个AlertDialog
                    return AlertDialog(
                      title: const Text("提示信息"),
                      content: const Text("您确定要删除吗?"),
                      // ---- 添加两个按钮
                      actions: <Widget>[
                        TextButton(
                          child: const Text("取消"),
                          onPressed: () {
                            print("点击了取消按钮");

                            Navigator.pop(context); // 关闭窗口
                          },
                        ),
                        TextButton(
                          child: const Text("确定"),
                          onPressed: () {
                            print("点击了确定按钮");
                            Navigator.pop(context);     // 关闭窗口
                          },
                        )
                      ],
                    );
                  });
            },
            child: const Text("AlertDialog")),
      ),
    );
  }
}
在上面的代码中,点击 ElevatedButton 按钮,调用了 showDialog 方法,showDialog 方法的 builder 参数是一个 WidgetBuilder,方法需要返回一个 Widget, 这里返回一个 AlertDialog,在 AlertDialog 中添加了两个文本按钮 TextButton ,一个是取消,一个是确定。
当点击确定和取消按钮的时候,Dialog 是不会自己消失的,需要调用 Navigator.pop(context) 关闭 Dialog 。
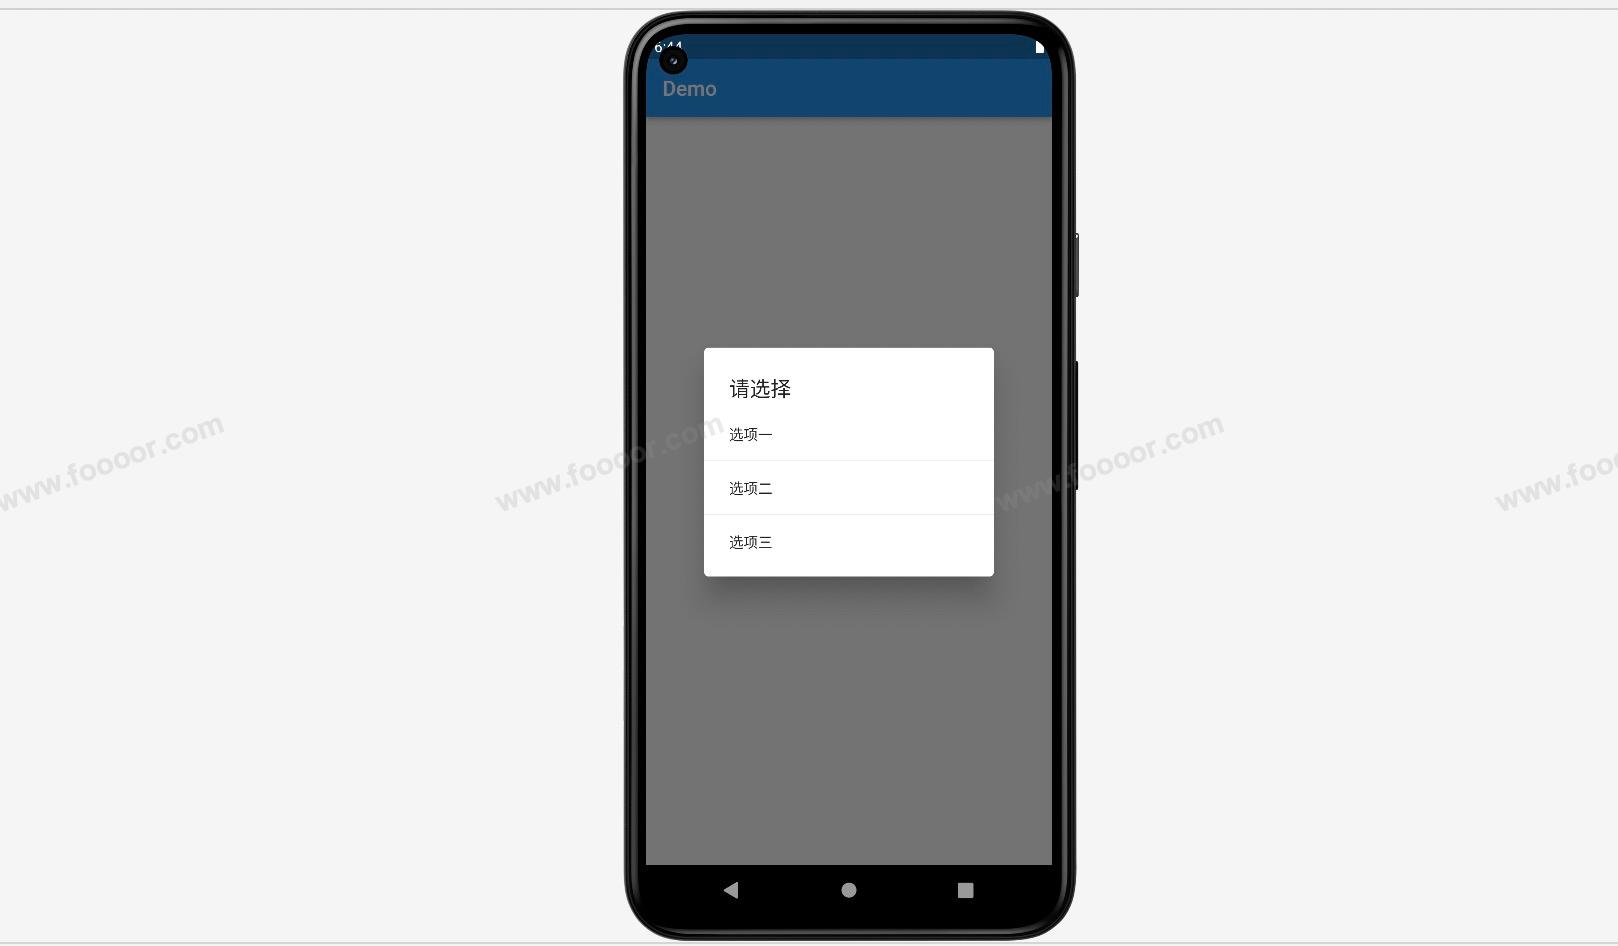
7.2 SimpleDialog
先看效果:
实现代码:
首先是在页面上添加了一个按钮,点击按钮,弹出 SimpleDialog 。
dart
import 'package:flutter/material.dart';

void main() => runApp(const MyApp());

/// App根Widget
class MyApp extends StatelessWidget {
  const MyApp({super.key});

  @override
  Widget build(BuildContext context) {
    return const MaterialApp(
      debugShowCheckedModeBanner: false,
      home: DemoPage(),
    );
  }
}

/// 页面
class DemoPage extends StatelessWidget {
  const DemoPage({super.key});

  @override
  Widget build(BuildContext context) {
    return Scaffold(
      appBar: AppBar(
        title: const Text('Demo'),
      ),
      body: Center(
        child: ElevatedButton(
            onPressed: () {
              // -------------显示SimpleDialog----------------
              showDialog(
                  barrierDismissible: true, //表示点击灰色背景的时候是否消失弹出框
                  context: context,
                  builder: (context) {
                    // ---- 创建SimpleDialog
                    return SimpleDialog(
                      title: const Text("请选择"),
                      // ---- children是各个选项,这里使用的是SimpleDialogOption创建
                      children: <Widget>[
                        SimpleDialogOption(
                          child: const Text("选项一"),
                          onPressed: () {
                            print("点击了选项一");
                            Navigator.pop(context);     // 关闭窗口
                          },
                        ),
                        const Divider(),
                        SimpleDialogOption(
                          child: const Text("选项二"),
                          onPressed: () {
                            print("点击了选项二");
                            Navigator.pop(context);     // 关闭窗口
                          },
                        ),
                        const Divider(),
                        SimpleDialogOption(
                          child: const Text("选项三"),
                          onPressed: () {
                            print("点击了选项三");
                            Navigator.pop(context);     // 关闭窗口
                          },
                        ),
                      ],
                    );
                  });
            },
            child: const Text("SimpleDialog")),
      ),
    );
  }
}
同样还是使用 showDialog 方法来显示 SimpleDialog ,SimpleDialog 中的 children 属性是弹出窗口的各个选项。
7.3 showModalBottomSheet
在前面弹出 Dialog 都是使用 showDialog 方法,实在屏幕中间弹出的,还可以使用 showModalBottomSheet 方法,在屏幕底部弹出。
先看效果:

点击按钮,从屏幕底部展示。
实现代码:
dart
import 'package:flutter/material.dart';

void main() => runApp(const MyApp());

/// App根Widget
class MyApp extends StatelessWidget {
  const MyApp({super.key});

  @override
  Widget build(BuildContext context) {
    return const MaterialApp(
      debugShowCheckedModeBanner: false,
      home: DemoPage(),
    );
  }
}

/// 页面
class DemoPage extends StatelessWidget {
  const DemoPage({super.key});

  @override
  Widget build(BuildContext context) {
    return Scaffold(
      appBar: AppBar(
        title: const Text('Demo'),
      ),
      body: Center(
        child: ElevatedButton(
            onPressed: () {
              // -------------在屏幕底部显示----------------
              showModalBottomSheet(
                  context: context,
                  builder: (context) {
                    // ---- 创建Widget用于显示
                    return SizedBox(
                      height: 220,
                      child: Column(
                        children: <Widget>[
                          ListTile(
                            title: const Text("点赞"),
                            onTap: () {
                              print("点击了点赞");
                              Navigator.pop(context);
                            },
                          ),
                          const Divider(),
                          ListTile(
                            title: const Text("转发"),
                            onTap: () {
                              print("点击了转发");
                              Navigator.pop(context);
                            },
                          ),
                          const Divider(),
                          ListTile(
                            title: const Text("收藏"),
                            onTap: () {
                              print("点击了收藏");
                              Navigator.pop(context);
                            },
                          )
                        ],
                      ),
                    );
                  });
            },
            child: const Text("showModalBottomSheet")),
      ),
    );
  }
}
使用 showModalBottomSheet 方法,展示弹出窗口,showModalBottomSheet 方法中的 builder 参数用来构建展示的 Widget,可以根据自己的需要进行布局和创建,这里是添加了三个 ListTile。
7.4 Dialog 返回的内容
在前面,调用 showDialog 和 showModalBottomSheet 方法的时候,是没有返回值的,我们也可以使用 Navigator.pop(context, "值") 来返回值。
举个栗子:
dart
import 'package:flutter/material.dart';

void main() => runApp(const MyApp());

/// App根Widget
class MyApp extends StatelessWidget {
  const MyApp({super.key});

  @override
  Widget build(BuildContext context) {
    return const MaterialApp(
      debugShowCheckedModeBanner: false,
      home: DemoPage(),
    );
  }
}

/// 页面
class DemoPage extends StatelessWidget {
  const DemoPage({super.key});

  void _showAlertDialog(BuildContext context) async {
    // -------------通过showDialog显示AlertDialog----------------
    var result = await showDialog(
        barrierDismissible: false, //表示点击灰色背景的时候是否消失弹出框
        context: context,
        builder: (context) {
          // ---- 返回一个AlertDialog
          return AlertDialog(
            title: const Text("提示信息"),
            content: const Text("您确定要删除吗?"),
            // ---- 添加两个按钮
            actions: <Widget>[
              TextButton(
                child: const Text("取消"),
                onPressed: () {
                  print("点击了取消按钮");
                  Navigator.pop(context, "取消"); // 关闭窗口,同时传值
                },
              ),
              TextButton(
                child: const Text("确定"),
                onPressed: () {
                  print("点击了确定按钮");
                  Navigator.pop(context, "确定"); // 关闭窗口,同时传值
                },
              )
            ],
          );
        });

    print("result:$result");	// 点击确定按钮时,打印确定,点击取消按钮时,打印取消
  }

  @override
  Widget build(BuildContext context) {
    return Scaffold(
      appBar: AppBar(
        title: const Text('Demo'),
      ),
      body: Center(
        child: ElevatedButton(
            onPressed: () {
              _showAlertDialog(context);
            },
            child: const Text("AlertDialog")),
      ),
    );
  }
}
在上面的代码中,我们先定义了一个私有方法 _showAlertDialog 该方法是一个 async 方法,在调用 showDialog 显示 Dialog 的时候,使用了 await ,这样会等待 showDialog 方法的返回结果。而 showDialog 方法的返回结果,是通过 Navigator.pop(context, "值") 来返回的,所以当调用 Navigator.pop(context, "值") 的时候,会将 "值" ,传递给 result 变量。
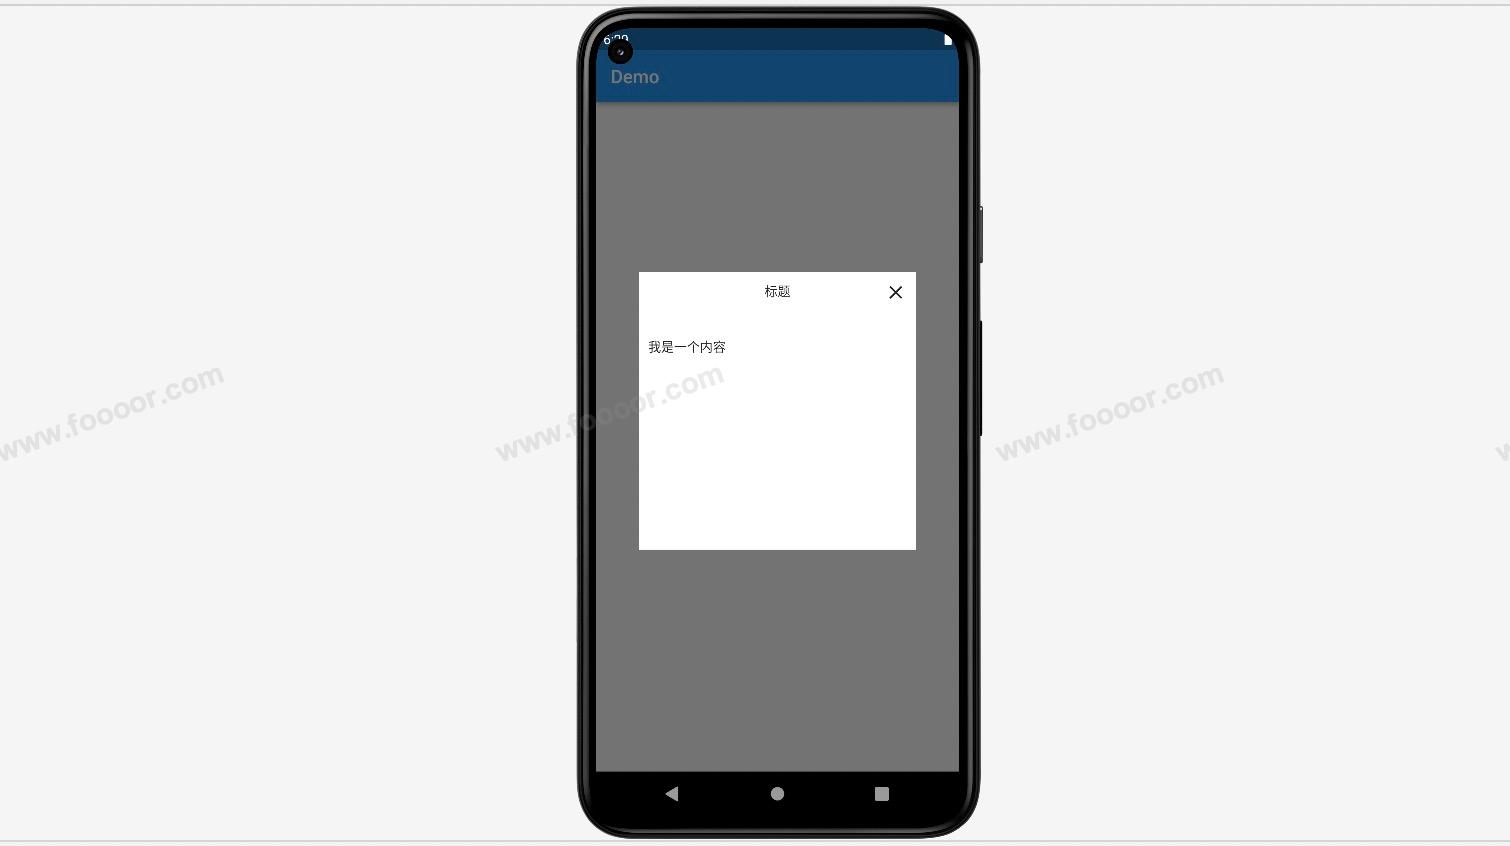
7.5 自定义Dialog
在上面我们使用了几种系统自带的 Dialog,但有些时候可能不满足我们的需求,所以我们可以自定义 Dialog。
自定义 Dialog 对象,需要继承 Dialog 类,并重写 build 函数。下面演示一下如何自定义 Dialog 。
举个栗子:
先看效果,简单的定义了一个弹出窗口。
实现代码:
1 定义 Dialog
首先定义了一个自定义的 MyDialog 类,继承自 Dialog 类。然后定义了三个属性,title 用来显示标题,content 用来显示内容,onClosed 是点击关闭按钮后的回调函数。Function()? 表示无参函数。
my_dialog.dart
dart
import 'package:flutter/material.dart';

class MyDialog extends Dialog {
  // 接收标题
  String title;

  // 接收内容
  String content;

  // 接收关闭按钮的回调函数
  Function()? onClosed;

  MyDialog({Key? key,
      required this.title,
      required this.onClosed,
      this.content = ""})
      : super(key: key);

  @override
  Widget build(BuildContext context) {
    return Material(
      // 定义显示是透明的
      type: MaterialType.transparency,
      // center 会铺满整个屏幕
      child: Center(
          child: Container(
        height: 300,
        width: 300,
        color: Colors.white,
        child: Column(
          children: <Widget>[
            Padding(
              padding: const EdgeInsets.all(10),
              child: Stack(
                // ---- 定义标题和关闭按钮
                children: <Widget>[
                  Align(
                    alignment: Alignment.center,
                    child: Text(title),
                  ),
                  Align(
                    alignment: Alignment.centerRight,
                    child: InkWell(
                      onTap: onClosed,
                      child: const Icon(Icons.close),
                    ),
                  )
                ],
              ),
            ),
            const Divider(),
            // ---- 定义显示的内容
            Container(
              padding: const EdgeInsets.all(10),
              width: double.infinity,
              child: Text(content, textAlign: TextAlign.left),
            )
          ],
        ),
      )),
    );
  }
}
Dialog 根组件使用的是 Material 组件,通过 type 来设置整个窗口的透明度,其中的 child 属性中的 Center 是全屏显示的。Container 才是弹出的窗口部分,可以根据需要进行布局。
2 显示 Dialog
显示 Dialog 也之前显示 AlertDialog 一样,也是使用的 showDialog 方法,当然在使用之前,先引入刚才自定义 Dialog 的文件。
main.dart
dart
import 'package:flutter/material.dart';
// ----1.引入自定义的Dialog
import './my_dialog.dart';

void main() => runApp(const MyApp());

/// App根Widget
class MyApp extends StatelessWidget {
  const MyApp({super.key});

  @override
  Widget build(BuildContext context) {
    return const MaterialApp(
      debugShowCheckedModeBanner: false,
      home: DemoPage(),
    );
  }
}

/// 页面
class DemoPage extends StatelessWidget {
  const DemoPage({super.key});

  @override
  Widget build(BuildContext context) {
    return Scaffold(
      appBar: AppBar(
        title: const Text('Demo'),
      ),
      body: Center(
        child: ElevatedButton(
            onPressed: () {
              // ----2.显示自定义的Dialog
              showDialog(
                  barrierDismissible: false, //表示点击灰色背景的时候是否消失弹出框
                  context: context,
                  builder: (context) {
                    // ----3.创建自定义的Dialog并传入参数
                    return MyDialog(
                        title: '标题',
                        onClosed: () {
                          print("关闭");
                          Navigator.of(context).pop();
                        },
                        content: "我是一个内容");
                  });
            },
            child: const Text("自定义Dialog")),
      ),
    );
  }
}
3 自动关闭
如果想要上面自定义的 Dialog 间隔 3 秒自动关闭该如何实现呢?
可以定义一个定时器,用来3秒后关闭窗口。
举个栗子:
dart
import 'dart:async';

import 'package:flutter/material.dart';

class MyDialog extends Dialog {
  // 接收标题
  String title;

  // 接收内容
  String content;

  // 接收关闭按钮的回调函数
  Function()? onClosed;

  // ---- 使用定时器定时关闭窗口
  void _showTimer(context){
    Timer.periodic(Duration(milliseconds: 3000), (t) {
      print('自动关闭');
      Navigator.pop(context);
      t.cancel();
    });
  }

  MyDialog({Key? key,
      required this.title,
      required this.onClosed,
      this.content = ""})
      : super(key: key);

  @override
  Widget build(BuildContext context) {

   	// ---- 打开定时器
    _showTimer(context);

    return Material(
      // 定义显示是透明的
      type: MaterialType.transparency,
      // center 会铺满整个屏幕
      child: Center(
          child: Container(
        height: 300,
        width: 300,
        color: Colors.white,
        child: Column(
          children: <Widget>[
            Padding(
              padding: const EdgeInsets.all(10),
              child: Stack(
                // ---- 定义标题和关闭按钮
                children: <Widget>[
                  Align(
                    alignment: Alignment.center,
                    child: Text(title),
                  ),
                  Align(
                    alignment: Alignment.centerRight,
                    child: InkWell(
                      onTap: onClosed,
                      child: const Icon(Icons.close),
                    ),
                  )
                ],
              ),
            ),
            const Divider(),
            // ---- 定义显示的内容
            Container(
              padding: const EdgeInsets.all(10),
              width: double.infinity,
              child: Text(content, textAlign: TextAlign.left),
            )
          ],
        ),
      )),
    );
  }
}
7.6 Toast
Flutter 中没有内置的 Toast 组件,但你可以使用第三方库来实现 Toast 的功能。一个常用的 Toast 插件是 fluttertoast,它提供了在 Flutter 应用中显示 Toast 的功能。
可以访问 pub.dev 网站( https://pub.dev/ )进行搜索。
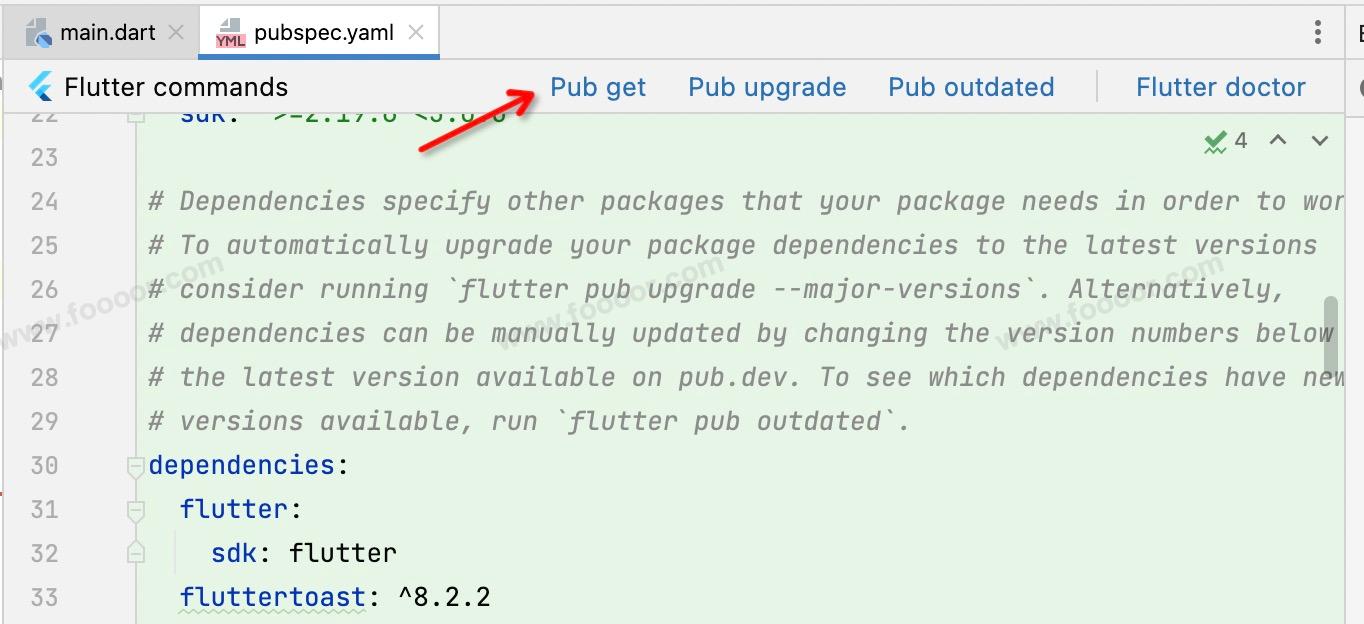
要使用 fluttertoast,首先需要在 pubspec.yaml 文件中添加它作为依赖:
yaml
dependencies:
  flutter:
    sdk: flutter
  fluttertoast: ^8.2.2
理论上修改 pubspec.yaml 后,保存就会自动下载依赖,如果没有的话,可以在项目下使用命令行运行 flutter pub get 来安装依赖。
Android Studio 也会弹出提示。
然后就可以在 Dart 代码中导入 fluttertoast 包并使用它来显示 Toast。
在 pub.dev 网站上搜索到,上面也会有使用的代码。
举个例子:
dart
import 'package:flutter/material.dart';
// ----1.引入fluttertoast
import 'package:fluttertoast/fluttertoast.dart';

void main() => runApp(const MyApp());

/// App根Widget
class MyApp extends StatelessWidget {
  const MyApp({super.key});

  @override
  Widget build(BuildContext context) {
    return const MaterialApp(
      debugShowCheckedModeBanner: false,
      home: DemoPage(),
    );
  }
}

/// 页面
class DemoPage extends StatelessWidget {
  const DemoPage({super.key});

  @override
  Widget build(BuildContext context) {
    return Scaffold(
      appBar: AppBar(
        title: const Text('Demo'),
      ),
      body: Center(
        child: ElevatedButton(
            onPressed: () {
              // ---- 2.显示Toast
              Fluttertoast.showToast(
                msg: "这是一个Toast消息",
                toastLength: Toast.LENGTH_SHORT, // Toast 显示时长
                gravity: ToastGravity.BOTTOM,    // Toast 位置
                timeInSecForIosWeb: 1,          // iOS/Web 上的显示时长
                backgroundColor: Colors.grey,   // 背景颜色
                textColor: Colors.white,        // 文本颜色
                fontSize: 16.0,                 // 文本大小
              );
            },
            child: const Text("Toast")),
      ),
    );
  }
}
显示效果:
