Appearance
SpringBoot3教程 - 2 HelloWorld
下面来使用 SpringBoot 来搭建一个 HelloWorld,通过浏览器访问项目的接口,返回显示 Hello World!
简单了解 SpringBoot 项目的搭建,非常的简单快捷。
搭建 SpringBoot 项目有两种方式:
- 手动使用 maven 项目搭建;
- 使用
Spring Initializr创建;
下面会分别介绍一下。
环境准备:
因为使用的是SpringBoot3.x,所以需要安装 JDK17,Maven>3.6,自己准备一下。
提供一个下载 Azul JDK 的地址:https://www.azul.com/downloads/?package=jdk#zulu ,可以根据系统和内核进行下载。
2.1 手动方式搭建HelloWorld
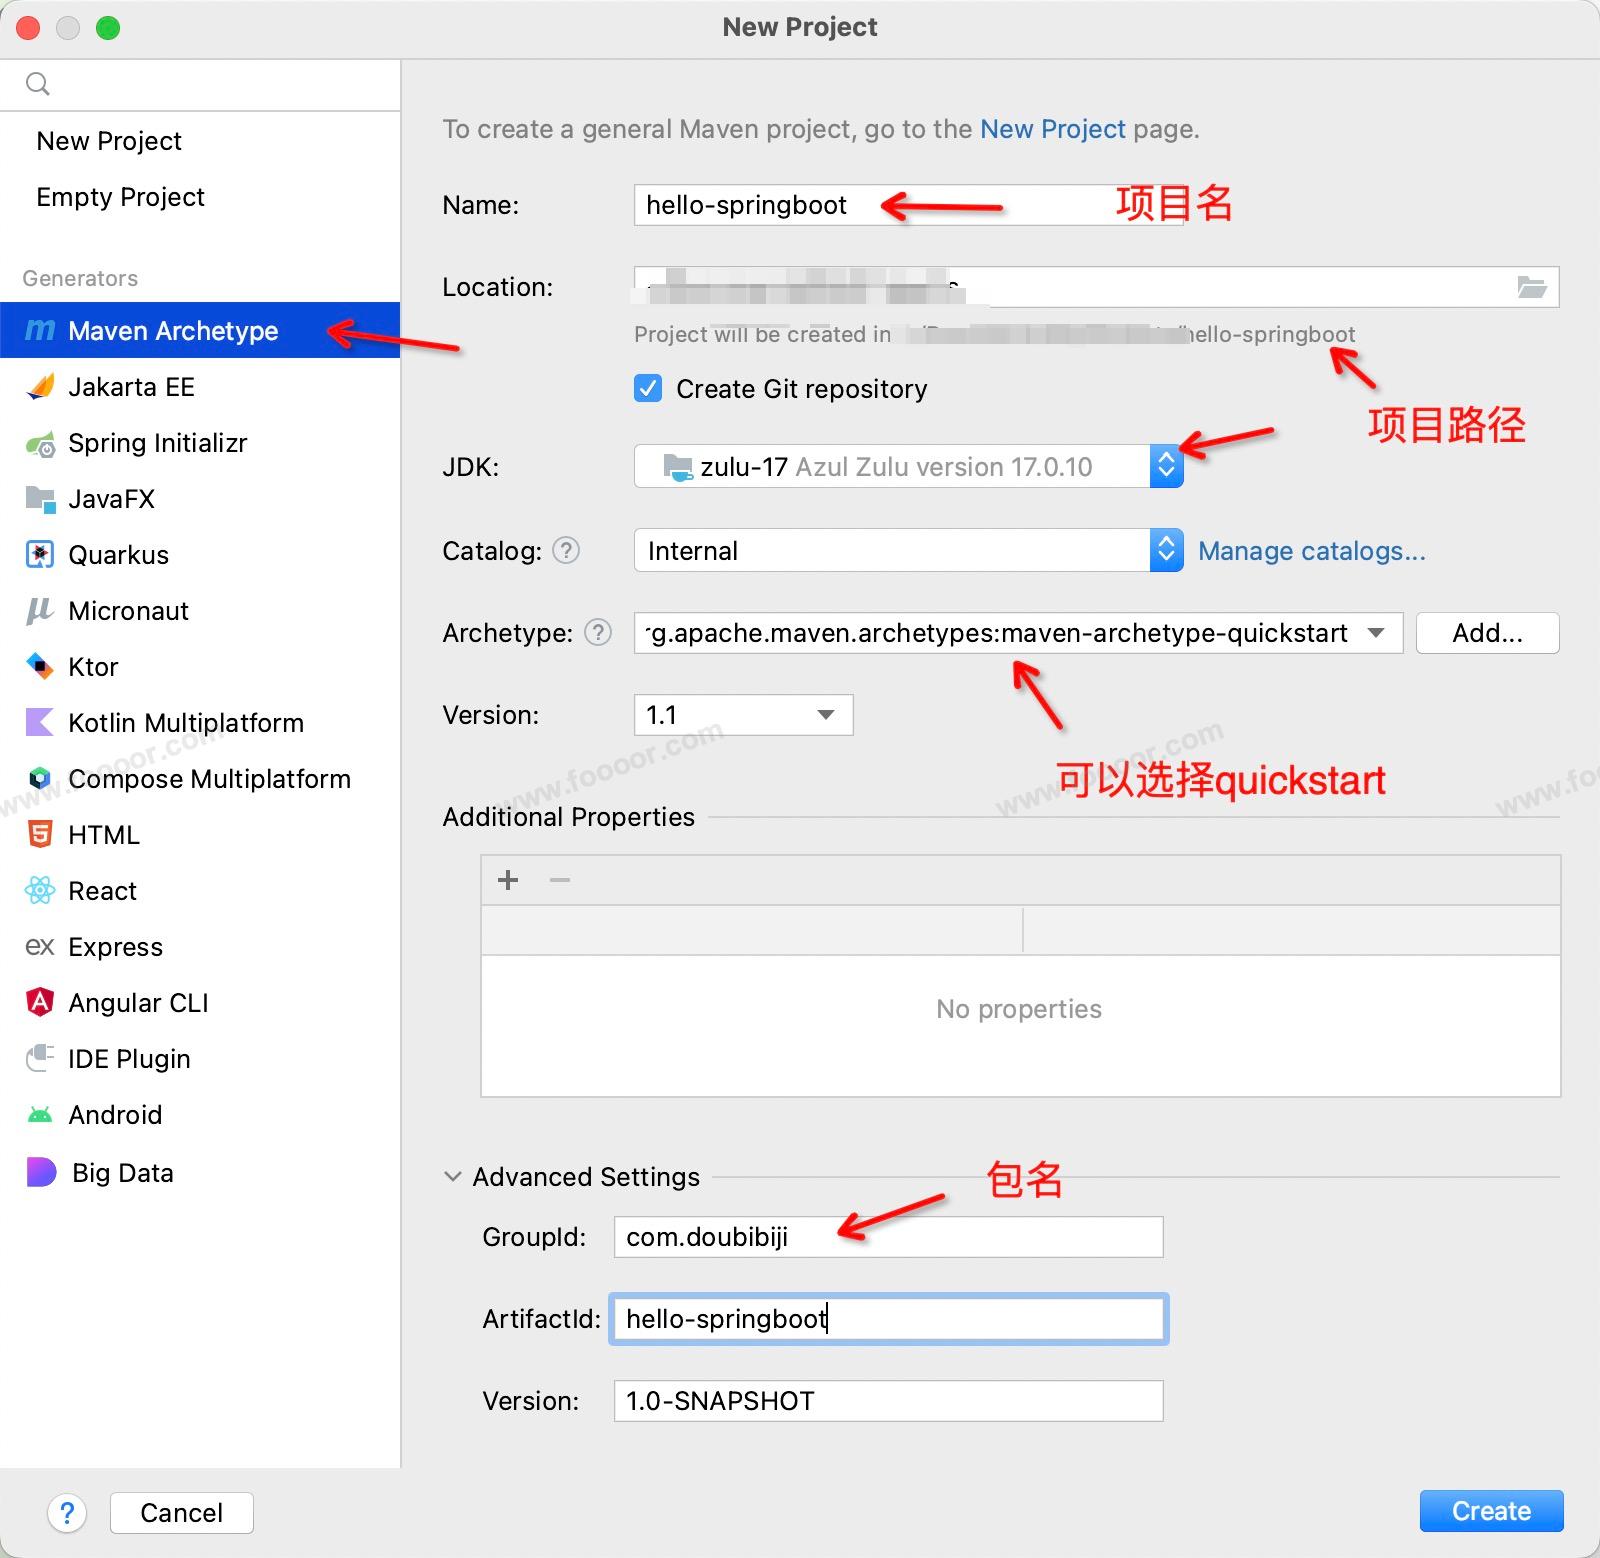
1 创建一个Maven项目
在IDEA中,File --> New --> Project --> 选择 Maven Archetype,然后填写项目信息:
2 修改项目pom.xml
在项目中 导入继承父项目依赖 和 导入web项目的依赖。
xml
<project xmlns="http://maven.apache.org/POM/4.0.0" xmlns:xsi="http://www.w3.org/2001/XMLSchema-instance"
  xsi:schemaLocation="http://maven.apache.org/POM/4.0.0 http://maven.apache.org/xsd/maven-4.0.0.xsd">
  <modelVersion>4.0.0</modelVersion>

  <!-- 1.导入继承父项目依赖 -->
  <parent>
    <groupId>org.springframework.boot</groupId>
    <artifactId>spring-boot-starter-parent</artifactId>
    <version>3.3.0</version>
  </parent>

  <groupId>com.doubibiji</groupId>
  <artifactId>hello-springboot</artifactId>
  <version>1.0-SNAPSHOT</version>
  <packaging>jar</packaging>

  <name>hello-springboot</name>
  <url>http://maven.apache.org</url>

  <properties>
    <project.build.sourceEncoding>UTF-8</project.build.sourceEncoding>
  </properties>

  <dependencies>
    <!-- 2.导入web项目的依赖,版本是spring-boot-starter-parent控制的 -->
    <dependency>
      <groupId>org.springframework.boot</groupId>
      <artifactId>spring-boot-starter-web</artifactId>
    </dependency>

    <!-- 3.用于springboot测试 -->
    <dependency>
			<groupId>org.springframework.boot</groupId>
			<artifactId>spring-boot-starter-test</artifactId>
			<scope>test</scope>
		</dependency>
  </dependencies>

  <build>
    <plugins>
      <!-- 4.用来打jar包项目的插件 -->
      <plugin>
        <groupId>org.springframework.boot</groupId>
        <artifactId>spring-boot-maven-plugin</artifactId>
      </plugin>
    </plugins>
  </build>
</project>
spring-boot-starter-web 是 web 开发的场景启动器,会帮我们引入 SpringMVC 相关的 web 依赖。后面我们开发什么,引入相关的场景启动器就可以了,解决了复杂的依赖关系。而且不用写版本号,因为在父项目 spring-boot-starter-parent 的父项目 spring-boot-dependencies 中对常用的 jar 的版本进行了声明。当然如果你想要改版本或者在spring-boot-dependencies 中没有声明所依赖的版本 ,那么加上版本号就好了,因为 Maven 是就近原则。
添加完依赖,可以右键 pom.xml --> Maven --> Reload Project,下载一下依赖。
3 创建主启动类
上面创建的 maven 项目,会在 com.doubibiji 包下创建一个 App 类,将其删掉,我们自己创建。
首先在创建一层 hellospringboot 包(其实不创建也没问题,只是增加项目级别的包,层次清晰),在 com.doubibiji.hellospringboot 包下创建 HelloSpringBootApplication 类(一般类名以Application结尾)。
java
package com.doubibiji.hellospringboot;

import org.springframework.boot.SpringApplication;
import org.springframework.boot.autoconfigure.SpringBootApplication;

@SpringBootApplication
public class HelloSpringBootApplication {

    public static void main(String[] args) {
        SpringApplication.run(HelloSpringBootApplication.class, args);
    }

}
类上添加 @SpringBootApplication 注解。
4 创建Controller
在 com.doubibiji.hellospringboot 包下创建 controller 包,在包下创建 HelloWorldController 类(名称随意),如下:
java
package com.doubibiji.hellospringboot.controller;

import org.springframework.web.bind.annotation.GetMapping;
import org.springframework.web.bind.annotation.RestController;

@RestController
public class HelloWorldController {

    @GetMapping("/hello")
    public String hello() {
        return "Hello World!";
    }
}
添加一个接口,使用 @RestController 注解的类将处理 HTTP 请求并返回 JSON 。
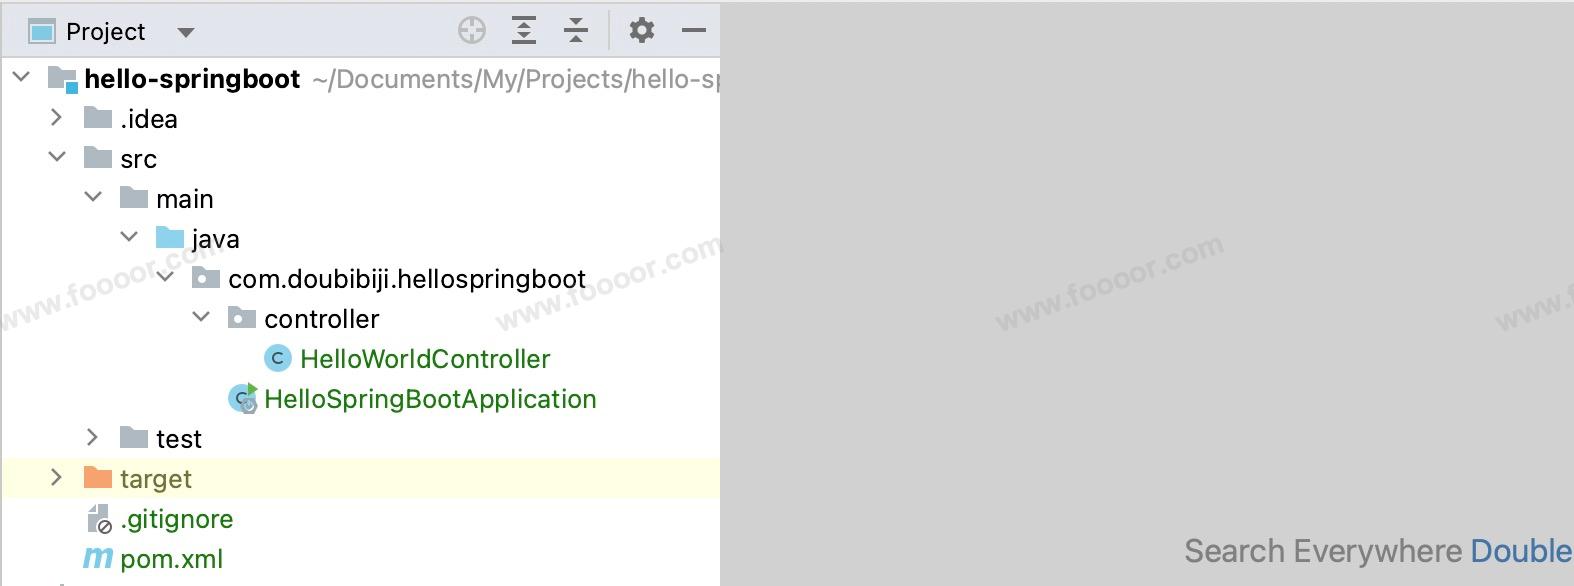
此时项目结构:
5 启动项目
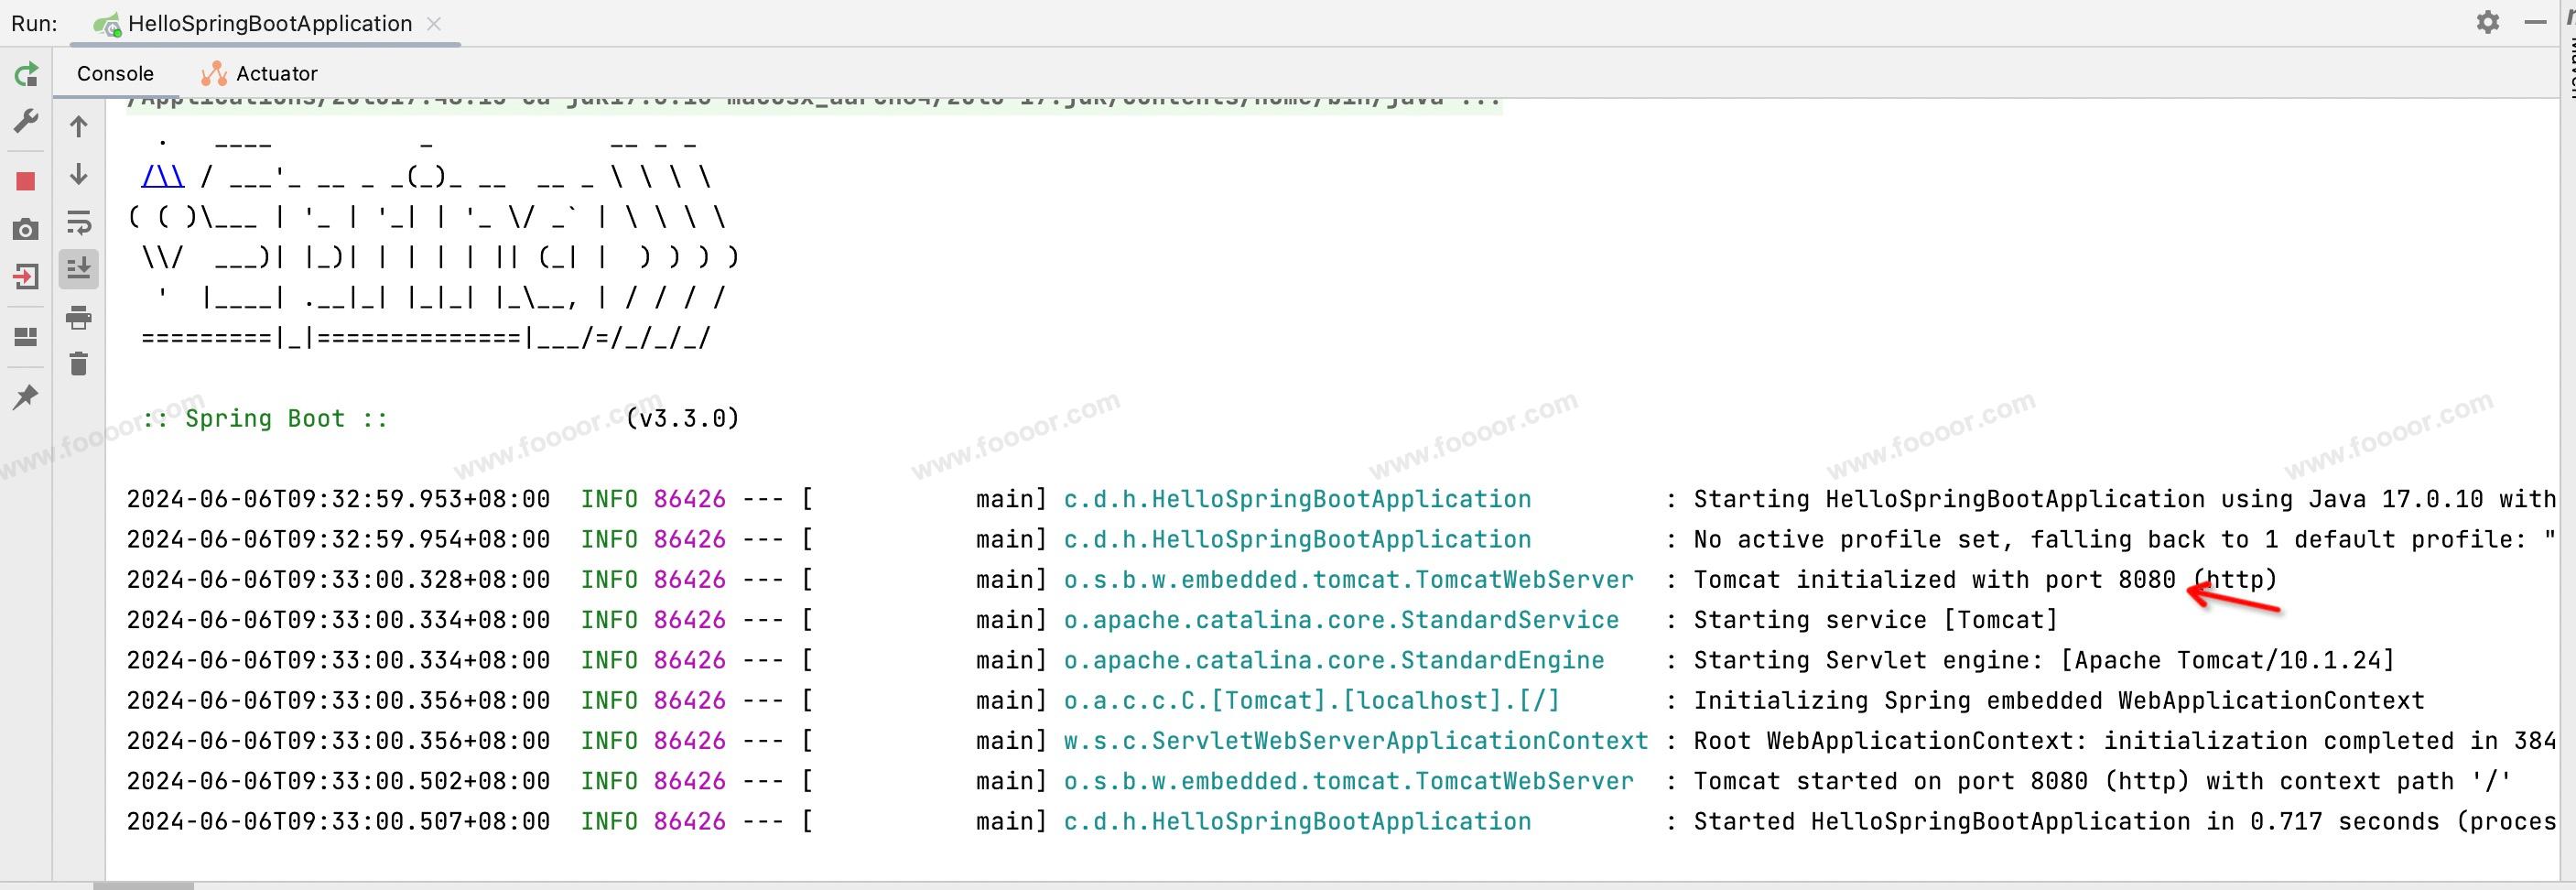
运行主启动类 HelloSpringBootApplication 。
在控制台可以看到运行日志,项目使用内置的 Tomcat,使用的是 8080 端口。
6 访问接口
浏览器访问接口: http://localhost:8080/hello

可以访问,没有问题,可以看到搭建一个SpringBoot项目非常的方便快捷,没有各种依赖的导入,依赖的导入非常简单。
还有更快的,使用 Spring Initializr 搭建。
继续。
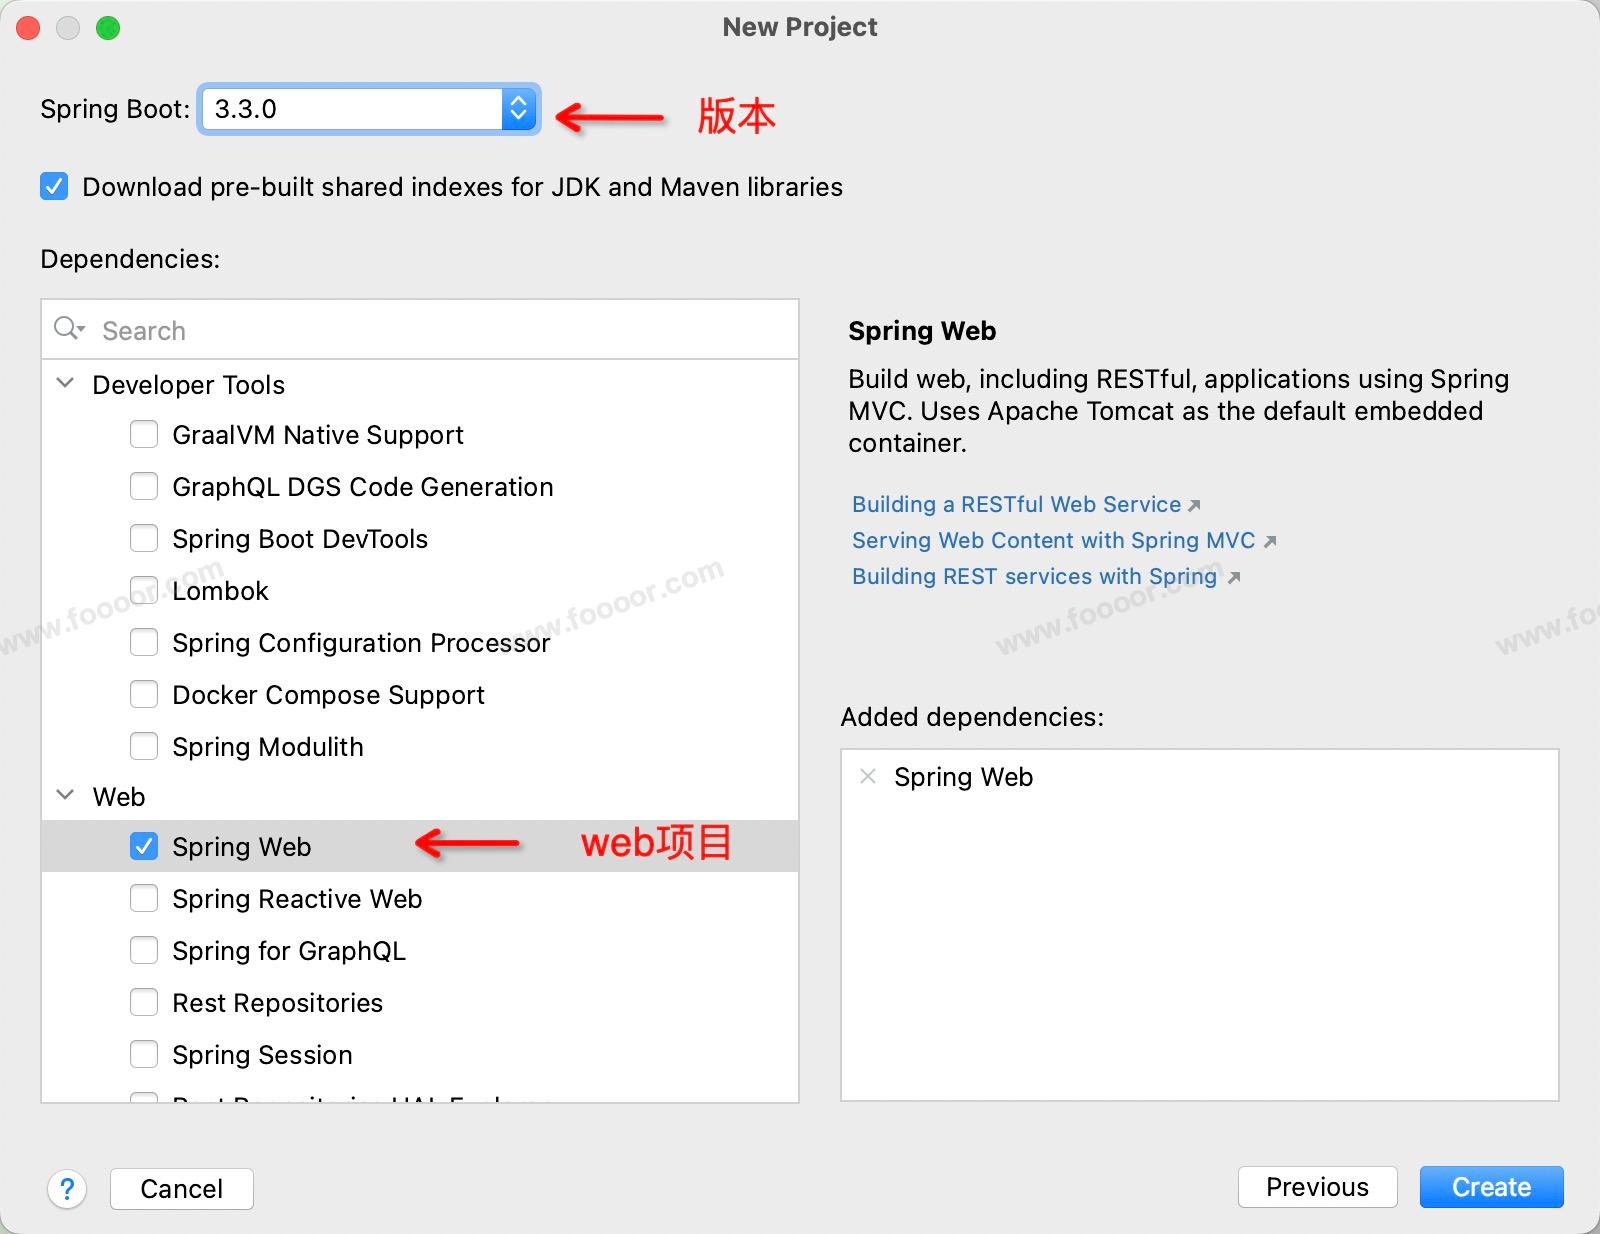
2.2 使用Spring Initializr搭建HelloWorld
使用 IDEA 的 Spring Initializr 可以快速创建Spring Boot项目。
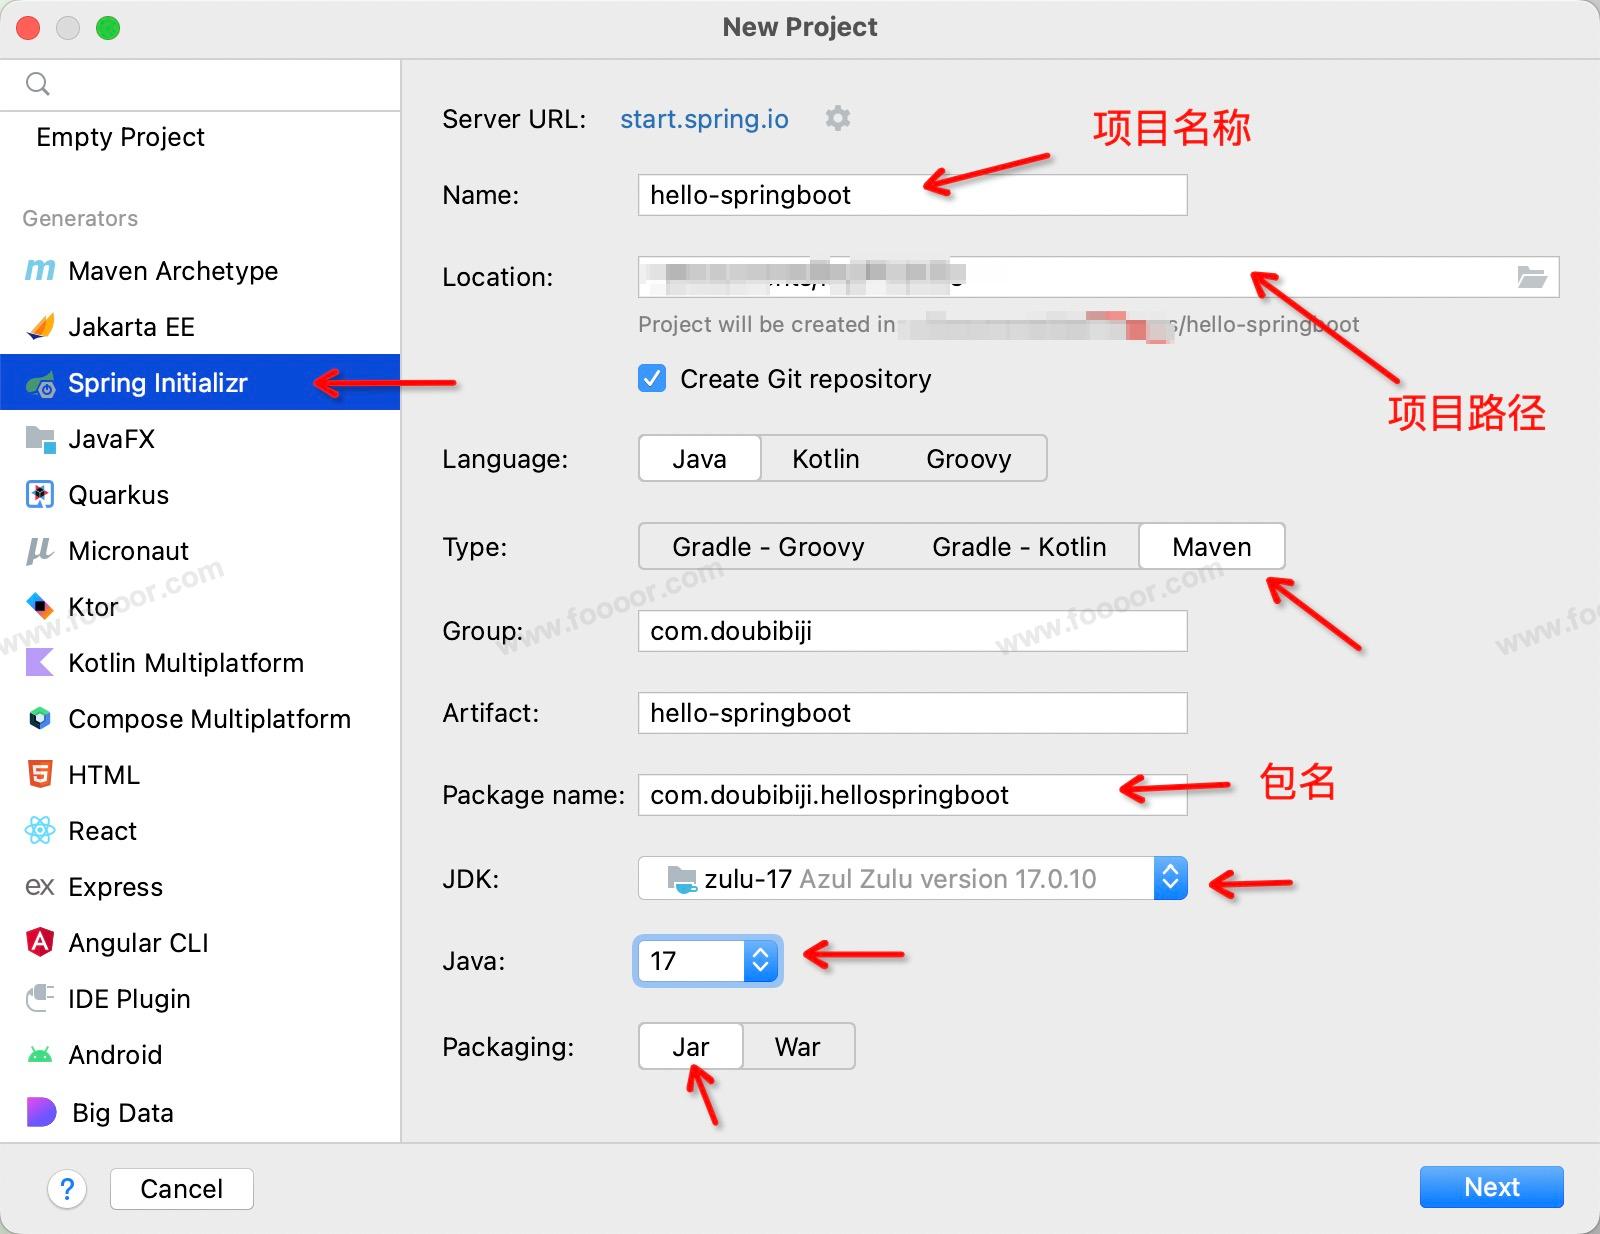
1 创建项目
File --> New --> Project --> 选择Spring Initializr。
然后填写项目信息,然后点击 next :
选择项目依赖
因为是 web 项目,所以勾选 Spring Web,会自动导入 SpringMVC 相关的依赖。
创建完成,项目结构如下:
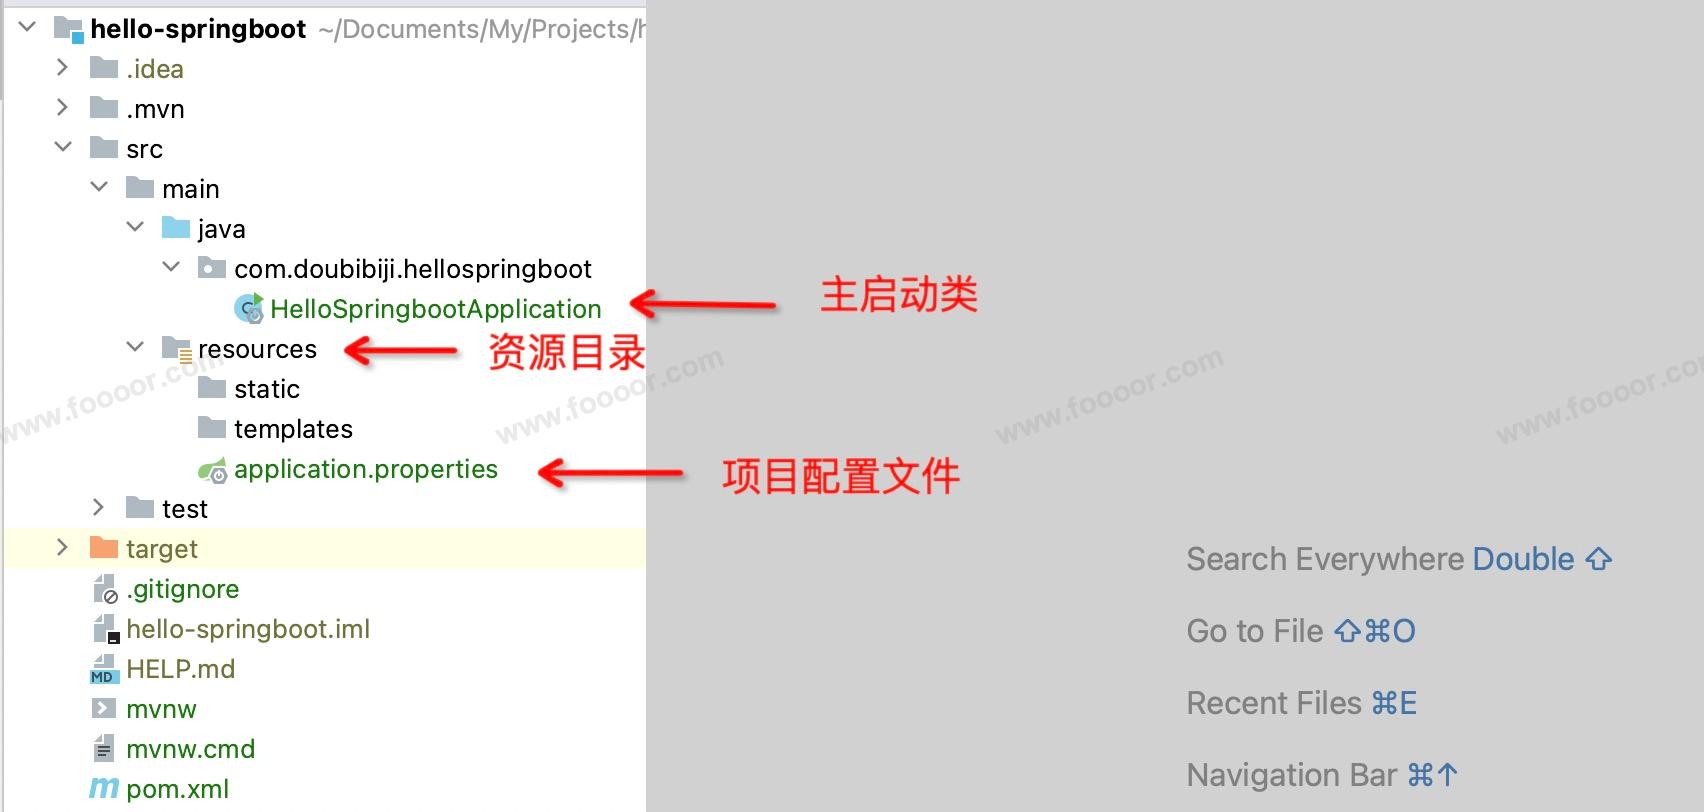
资源目录下的 static 用来放置页面静态资源,templates 用来放置模板引擎的模板页面,因为现在项目开发主要使用前后端分离,前端使用 Vue 开发,所以这两个目录基本不用了,可以删掉。
使用 Spring Initializr 创建,会自动创建主启动类。
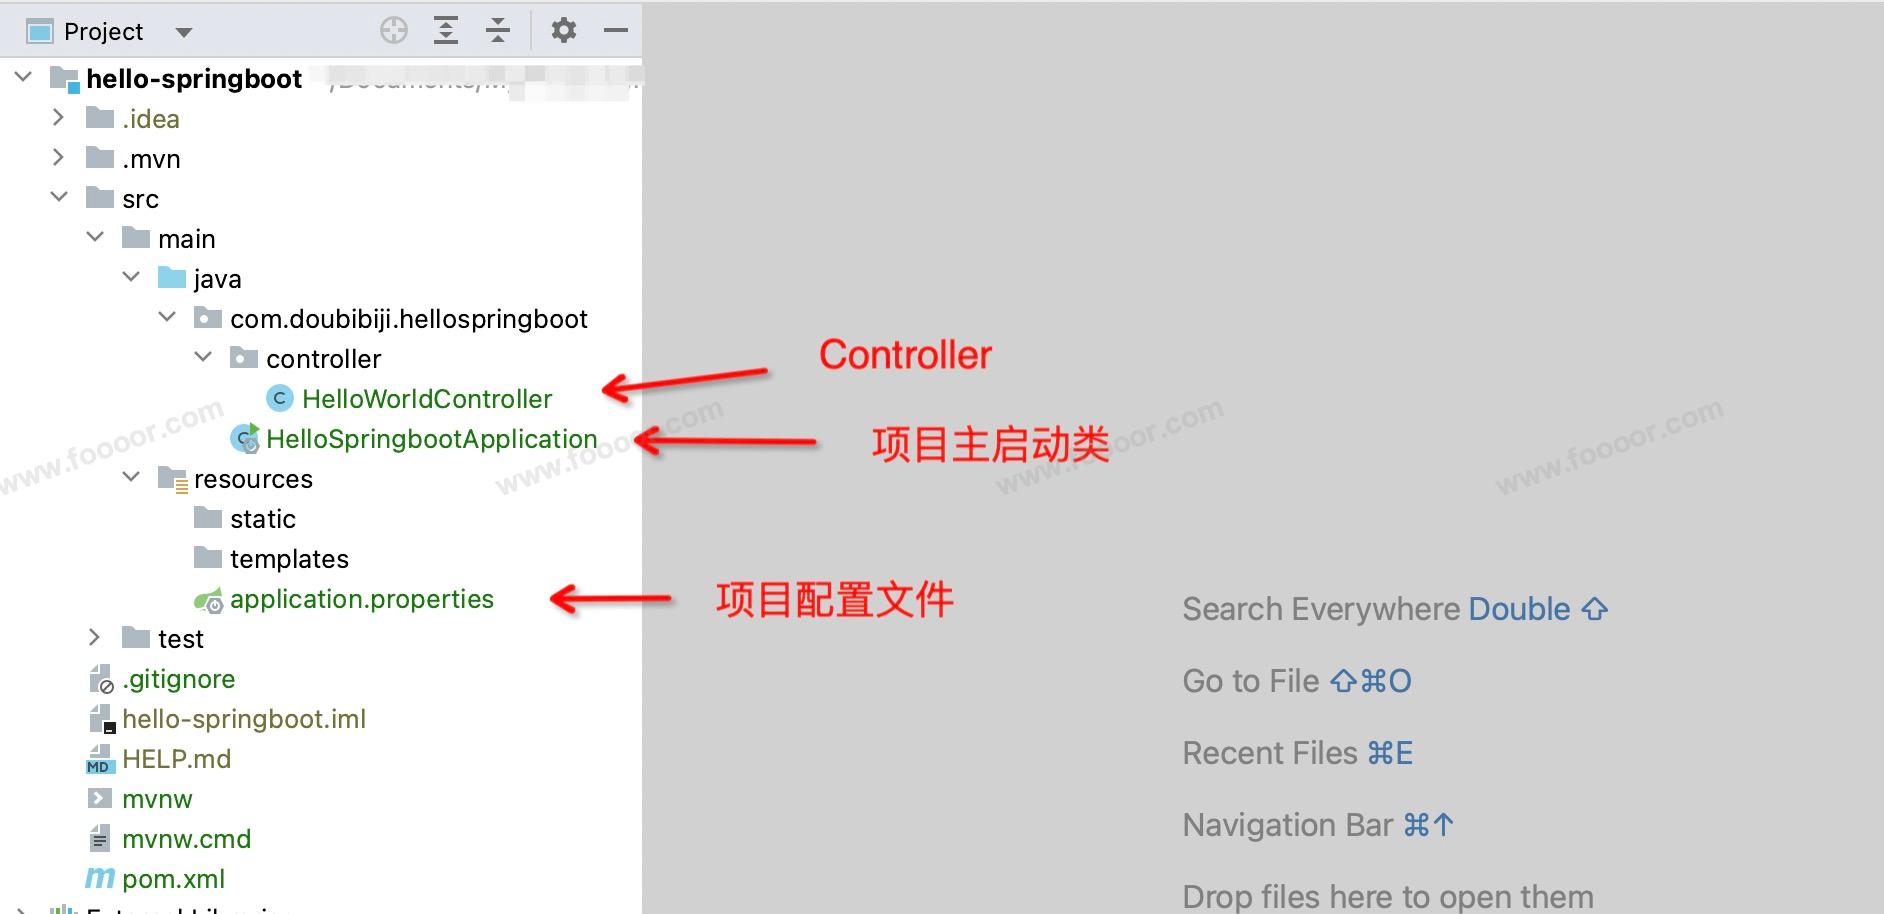
2 编写Controller
默认生成的 Spring Boot 项目,主程序已经生成好了,我们只需要编写自己的业务逻辑。
在项目包下创建 controller 的包,并创建 HelloWorldController.java 。
HelloWorldController.java
java
package com.doubibiji.hellospringboot.controller;

import org.springframework.web.bind.annotation.RequestMapping;
import org.springframework.web.bind.annotation.RestController;

@RestController
public class HelloWorldController {

    @GetMapping("/hello")
    public String hello() {
        return "Hello World!";
    }
}
添加一个接口。
3 启动并访问接口
运行主启动类 HelloSpringBootApplication ,然后在浏览器访问接口: http://localhost:8080/hello
可以访问,没有问题,是不是更快了。
4 查看项目pom.xml
查看项目的 pom.xml 文件,可以看到使用 Spring Initializr 搭建和手动的区别不大,只是多引入了用于测试和打包的依赖。
xml
<?xml version="1.0" encoding="UTF-8"?>
<project xmlns="http://maven.apache.org/POM/4.0.0" xmlns:xsi="http://www.w3.org/2001/XMLSchema-instance"
         xsi:schemaLocation="http://maven.apache.org/POM/4.0.0 https://maven.apache.org/xsd/maven-4.0.0.xsd">
    <modelVersion>4.0.0</modelVersion>
    <parent>
        <groupId>org.springframework.boot</groupId>
        <artifactId>spring-boot-starter-parent</artifactId>
        <version>3.3.0</version>
        <relativePath/> <!-- lookup parent from repository -->
    </parent>
    <groupId>com.doubibiji</groupId>
    <artifactId>hello-springboot</artifactId>
    <version>0.0.1-SNAPSHOT</version>
    <name>hello-springboot</name>
    <description>hello-springboot</description>
    <properties>
        <java.version>17</java.version>
    </properties>
    <dependencies>
        <dependency>
            <groupId>org.springframework.boot</groupId>
            <artifactId>spring-boot-starter-web</artifactId>
        </dependency>

        <!-- 测试用的依赖 -->
        <dependency>
            <groupId>org.springframework.boot</groupId>
            <artifactId>spring-boot-starter-test</artifactId>
            <scope>test</scope>
        </dependency>
    </dependencies>

    <build>
        <plugins>
            <!-- 用来打jar包项目的插件 -->
            <plugin>
                <groupId>org.springframework.boot</groupId>
                <artifactId>spring-boot-maven-plugin</artifactId>
            </plugin>
        </plugins>
    </build>

</project>
2.3 打jar包运行
1 打jar包
首先要在 pom.xml 文件中引入 spring-boot-maven-plugin 插件,上面搭建的时候已经引入了。
右侧的 Maven 窗口,找到 package 操作,双击打包。
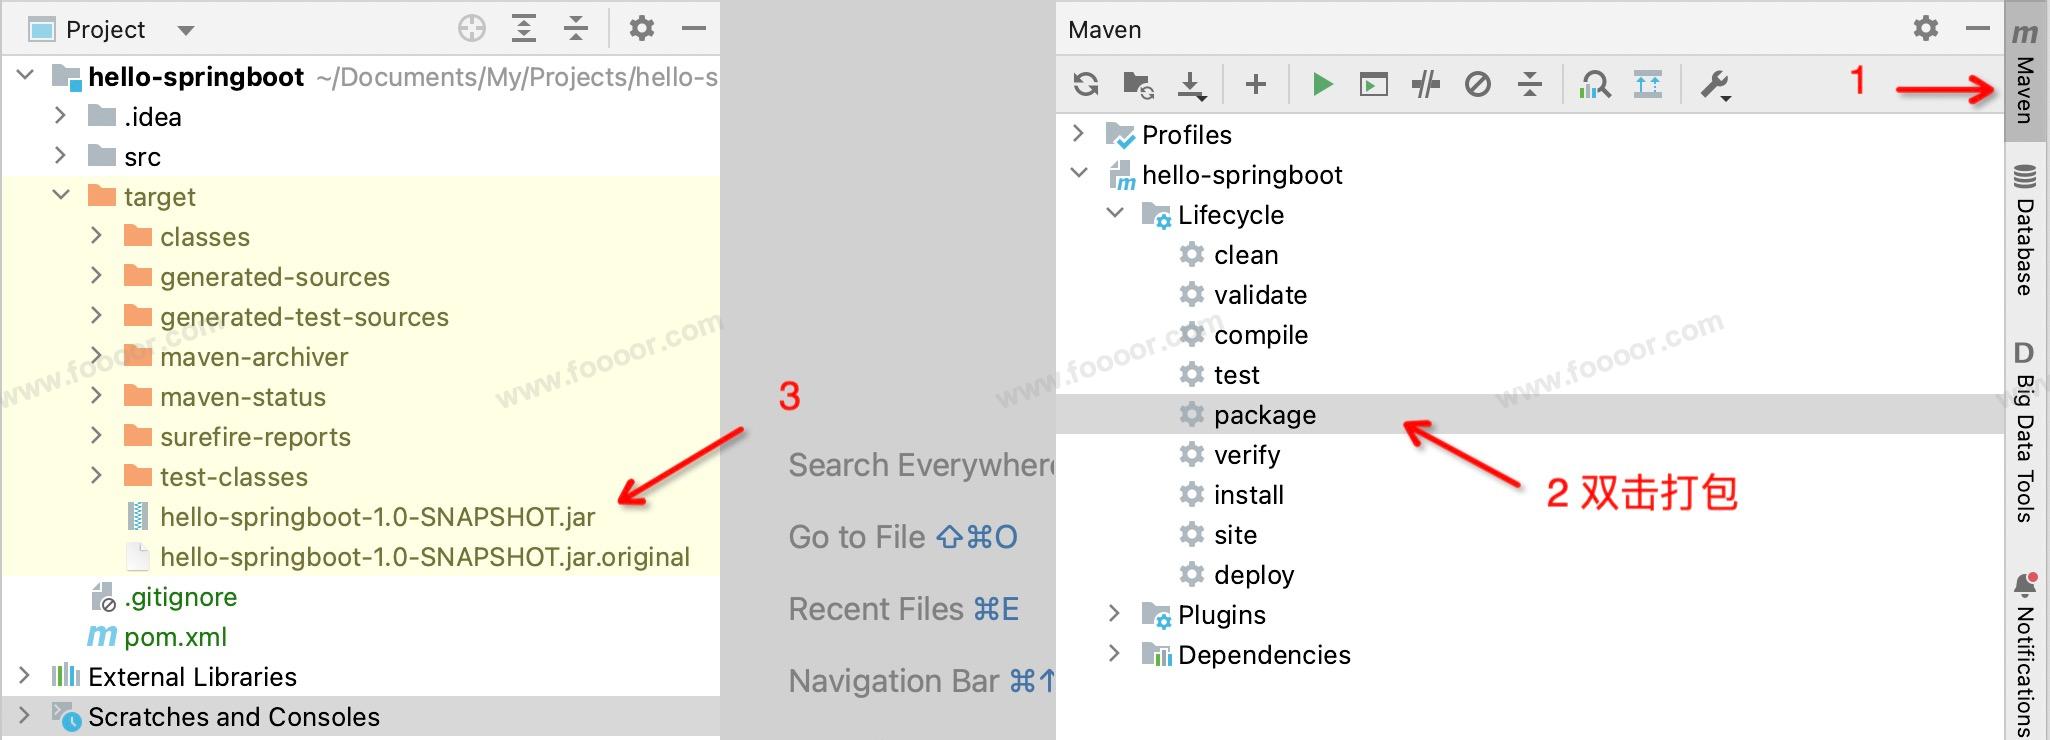
执行完成,会在项目下的 target 目录下生成对应的项目 jar 包。
2 运行
在终端进入到 jar 包所在的目录,然后运行 jar 包就可以了。
在 IDEA 的终端中运行也可以。
shell
java -jar hello-springboot-1.0-SNAPSHOT.jar运行效果:
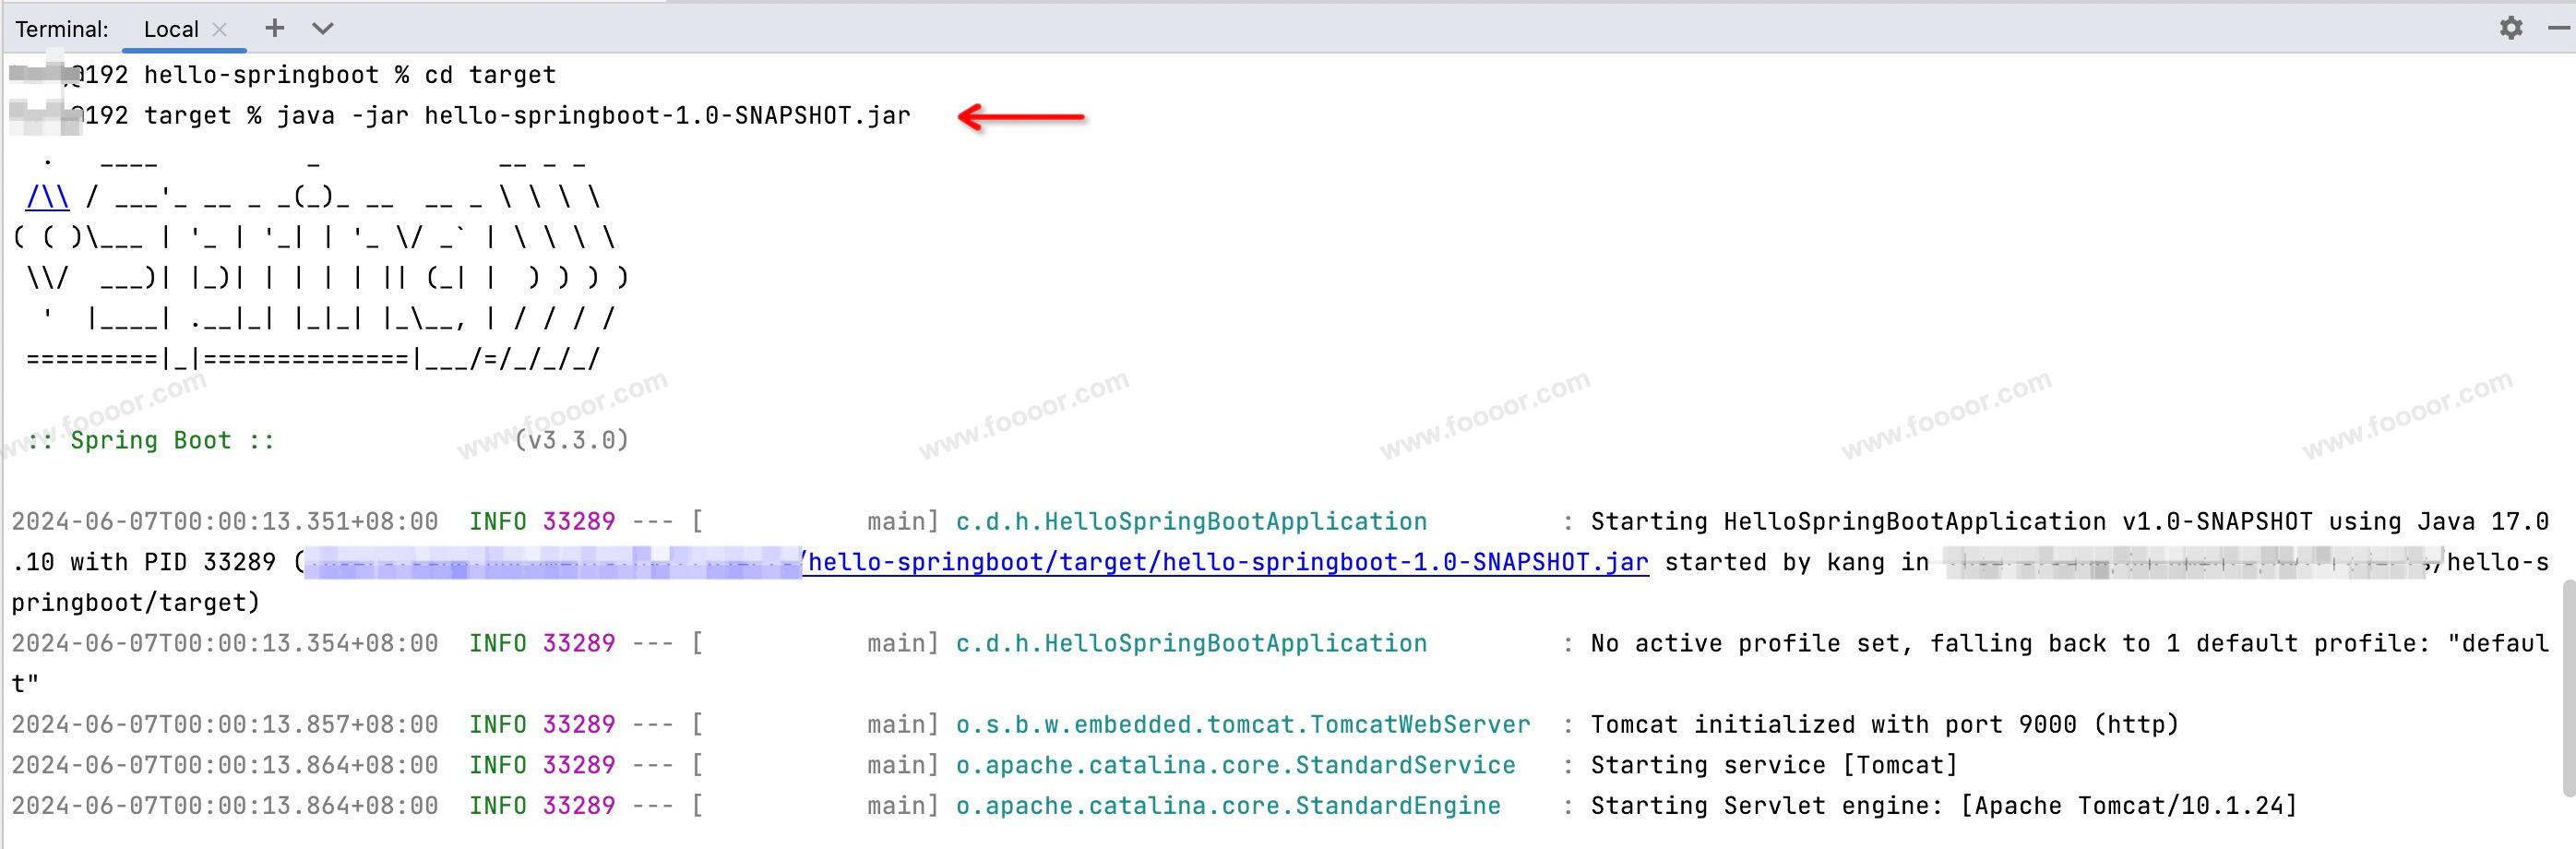
可以发现运行项目非常的简单,只要有 Java 环境,直接运行 java -jar 就可以了,不用安装 Tomcat ,非常方便!!!
2.4 HelloWorld程序说明
下面对 HelloWorld 做一些说明,更好的了解 SpringBoot项目。
1 Spring默认扫描的包
以前在开发 Spring 项目的时候,需要使用 component-scan 配置要扫描的包,将包中的组件添加到 Spring 容器中。
在 SpringBoot 项目中,主启动类上的 @SpringBootApplication 注解是一个复合注解,其中包含了 @ComponentScan 注解,默认是只会扫描主启动类所在的包及其子包下面的组件,放在其他位置是不可的,可以通过修改配置来更改。
方式一:给 @SpringBootApplication 通过 scanBasePackages 属性指定:
java
package com.doubibiji.hellospringboot;

import org.springframework.boot.SpringApplication;
import org.springframework.boot.autoconfigure.SpringBootApplication;
import org.springframework.context.annotation.ComponentScan;

@SpringBootApplication(scanBasePackages = "com.doubibiji.hellospringboot")
// 或者配置多个
// @SpringBootApplication(scanBasePackages = {"com.doubibiji.hellospringboot", "com.doubi"})
public class HelloSpringbootApplication {
    public static void main(String[] args) {
        SpringApplication.run(HelloSpringbootApplication.class, args);
    }
}
方式二:添加 @ComponentScan 注解指定:
java
package com.doubibiji.hellospringboot;

import org.springframework.boot.SpringApplication;
import org.springframework.boot.autoconfigure.SpringBootApplication;
import org.springframework.context.annotation.ComponentScan;

@SpringBootApplication
@ComponentScan("com.doubibiji.hellospringboot")
// 或者配置多个
// @ComponentScan(basePackages = {"com.doubibiji.hellospringboot", "com.doubi"})
public class HelloSpringbootApplication {

    public static void main(String[] args) {
        SpringApplication.run(HelloSpringbootApplication.class, args);
    }

}