Appearance
SpringMVC教程 - 4 请求映射与RESTful API设计
下面先来看一下 SpringMVC 对请求接口的映射配置,也就是请求路径怎么和 Controller 中的方法对应。
4.1 RESTful API
在讲解请求映射之前,先讲一下什么是 RESTful API。
1 非Restful接口设计
首先 API(Application Programming Interface)就是应用程序接口,HTTP API 也就是 Web 服务器提供的接口,供前端或其他服务调用。
在以前,我们设计接口的时候,提供查看、创建、编辑、删除的接口,我们可以这样设计接口:
java
http://www.foooor.com/student/getStudent  	  # 获取单个学生
http://www.foooor.com/student/getStudentList  # 获取学生列表
http://www.foooor.com/student/createStudent   # 创建学生
http://www.foooor.com/student/updateStudent   # 更新学生
http://www.foooor.com/student/deleteStudent   # 删除学生
这种设计方式的问题在于:
- 接口中动词重复:URL 已经体现了资源(例如student信息),但操作被写在了路径里(getStudent、createStudent),显得冗余。
- 不遵循 HTTP 方法语义:每个接口都是 POST 或 GET,无法直接通过 HTTP 方法表达“获取”、“创建”、“更新”、“删除”的含义。
- 不利于扩展:后续增加新的操作(例如冻结用户、重置密码)时,很容易出现大量类似
/student/doSomething的接口,结构混乱。
2 RESTful的设计思想
REST(Representational State Transfer)是一种资源为中心的架构风格,它是一种 API 的设计规范。
其核心思想是:
- 资源为核心:每个资源都有唯一 URI,用名词表示,不在 URL 中写动词。
- HTTP 方法表达操作语义:GET、POST、PUT、PATCH、DELETE 等方法用来描述获取、创建、更新、删除等操作,而非在 URL 中体现。
- 简单、无状态、可扩展:每个请求包含完成操作所需的全部信息,服务器不保存客户端状态,接口易于维护和扩展。
总结来说,RESTful API 的设计目标是让接口简洁、直观、易于理解和扩展,同时充分利用 HTTP 协议的标准功能(状态码、缓存、幂等性等)。
举个栗子:
如果以 RESTful 的风格设计 API,上面的学生接口可以设计如下:
| 操作 | HTTP 方法 | URL | 描述 |
|---|---|---|---|
| 获取学生列表 | GET | http://www.foooor.com/students | 获取所有学生 |
| 获取单个学生 | GET | http://www.foooor.com/students/{id} | 获取指定 ID 的学生 |
| 创建学生 | POST | http://www.foooor.com/students | 创建新学生 |
| 更新学生 | PUT | http://www.foooor.com/students/{id} | 用完整信息更新学生 |
| 删除学生 | DELETE | http://www.foooor.com/students/{id} | 删除指定学生 |
可以看到:
URL 只表示资源(名词),操作通过 HTTP 的 方法 表达。
{id}是路径参数,表示特定的学生。GET/PUT/DELETE是幂等的,即重复请求不会改变结果;POST 通常用于创建新资源,不幂等。
通过使用 RESTful API ,接口具有如下优势:
- 清晰直观:URL 与资源一一对应,HTTP 方法明确表达操作语义。
- 易于扩展:新增资源或操作不会破坏现有接口结构。
- 符合标准 HTTP 协议:方便缓存、负载均衡和限流策略。
- 便于理解和维护:前端或第三方开发者可以快速理解接口含义。
SpringMVC 对 RESTful API 提供了良好的支持,可以很方便的实现 Restful API。
4.2 实现Restful接口
在 HelloWorld 的程序中,我们使用了 @GetMapping 对指定的请求进行了映射。SpringMVC 还提供了 @PostMapping 、@PutMapping、@DeleteMapping 注解,可以帮我们完成 Restful 风格的 API。
1 接口实现
下面重新创建一个 StudentController,并编写接口,处理学生的查询、新增、删除和修改。
java
package com.foooor.hellospringmvc.controller;

import com.foooor.hellospringmvc.common.Result;
import org.springframework.stereotype.Controller;
import org.springframework.web.bind.annotation.*;

@Controller
public class StudentController {

    /**
     * 查询学生列表
     */
    @GetMapping("/students")
    @ResponseBody
    public Result listStudents() {
        return Result.success("查询学生列表");
    }

    /**
     * 查询学生详情
     */
    @GetMapping("/students/{id}")
    @ResponseBody
    public Result getStudentDetail(@PathVariable("id") Long id) {
        return Result.success("查询学生详情:" + id);
    }

    /**
     * 创建学生
     */
    @PostMapping("/students")
    @ResponseBody
    public Result createStudent() {
        return Result.success("创建学生");
    }

    /**
     * 更新学生
     */
    @PutMapping("/students/{id}")
    @ResponseBody
    public Result updateStudent(@PathVariable("id") Long id) {
        return Result.success("更新学生:" + id);
    }

    /**
     * 删除学生
     */
    @DeleteMapping("/students/{id}")
    @ResponseBody
    public Result deleteStudent(@PathVariable("id") Long id) {
        return Result.success("删除学生:" + id);
    }

}- 当然上面的接口只是接收请求,没有真正操作数据库进行学生的操作,正常情况下,需要调用 Service 、Dao最终调用数据操作。
- 在上面代码中,我们分别使用了
@GetMapping、@PostMapping、@PutMapping、@DeleteMapping注解实现了 Restful 风格的接口。 @GetMapping("/students/{id}")路径中存在参数id,路径中的参数id可以通过@PathVariable("id")来获取到,并作为方法参数。- 需要注意:
@PathVariable("id")括号中的id不要省略,否则在 Spring6 中会报错,需要在 pom.xml 进行额外的配置才行,下一个章节讲解(编译需要添加-parameters参数),所以我建议不要省略。
如果请求中有多个参数,可以这样写:
java
@GetMapping("/student/{studentId}/course/{courseId}")
public String getStudentCourse(@PathVariable("studentId") Long studentId, @PathVariable("courseId") Long courseId) {
    //...
}{}表示变量,@PathVariable用来接收。
2 接口测试
上面的接口需要使用不同的 HTTP 请求方法才可以,通过浏览器地址栏只能发起 Get 请求。在实际的开发中,前端可以使用 JavaScript 发起不同方法的请求。
这里使用一下第三方工具 Apifox 来发起请求。在 Apifox 工具中,首先创建项目,然后新建接口。
下面以 Put 方法为例,请求更新学生的接口,如下:
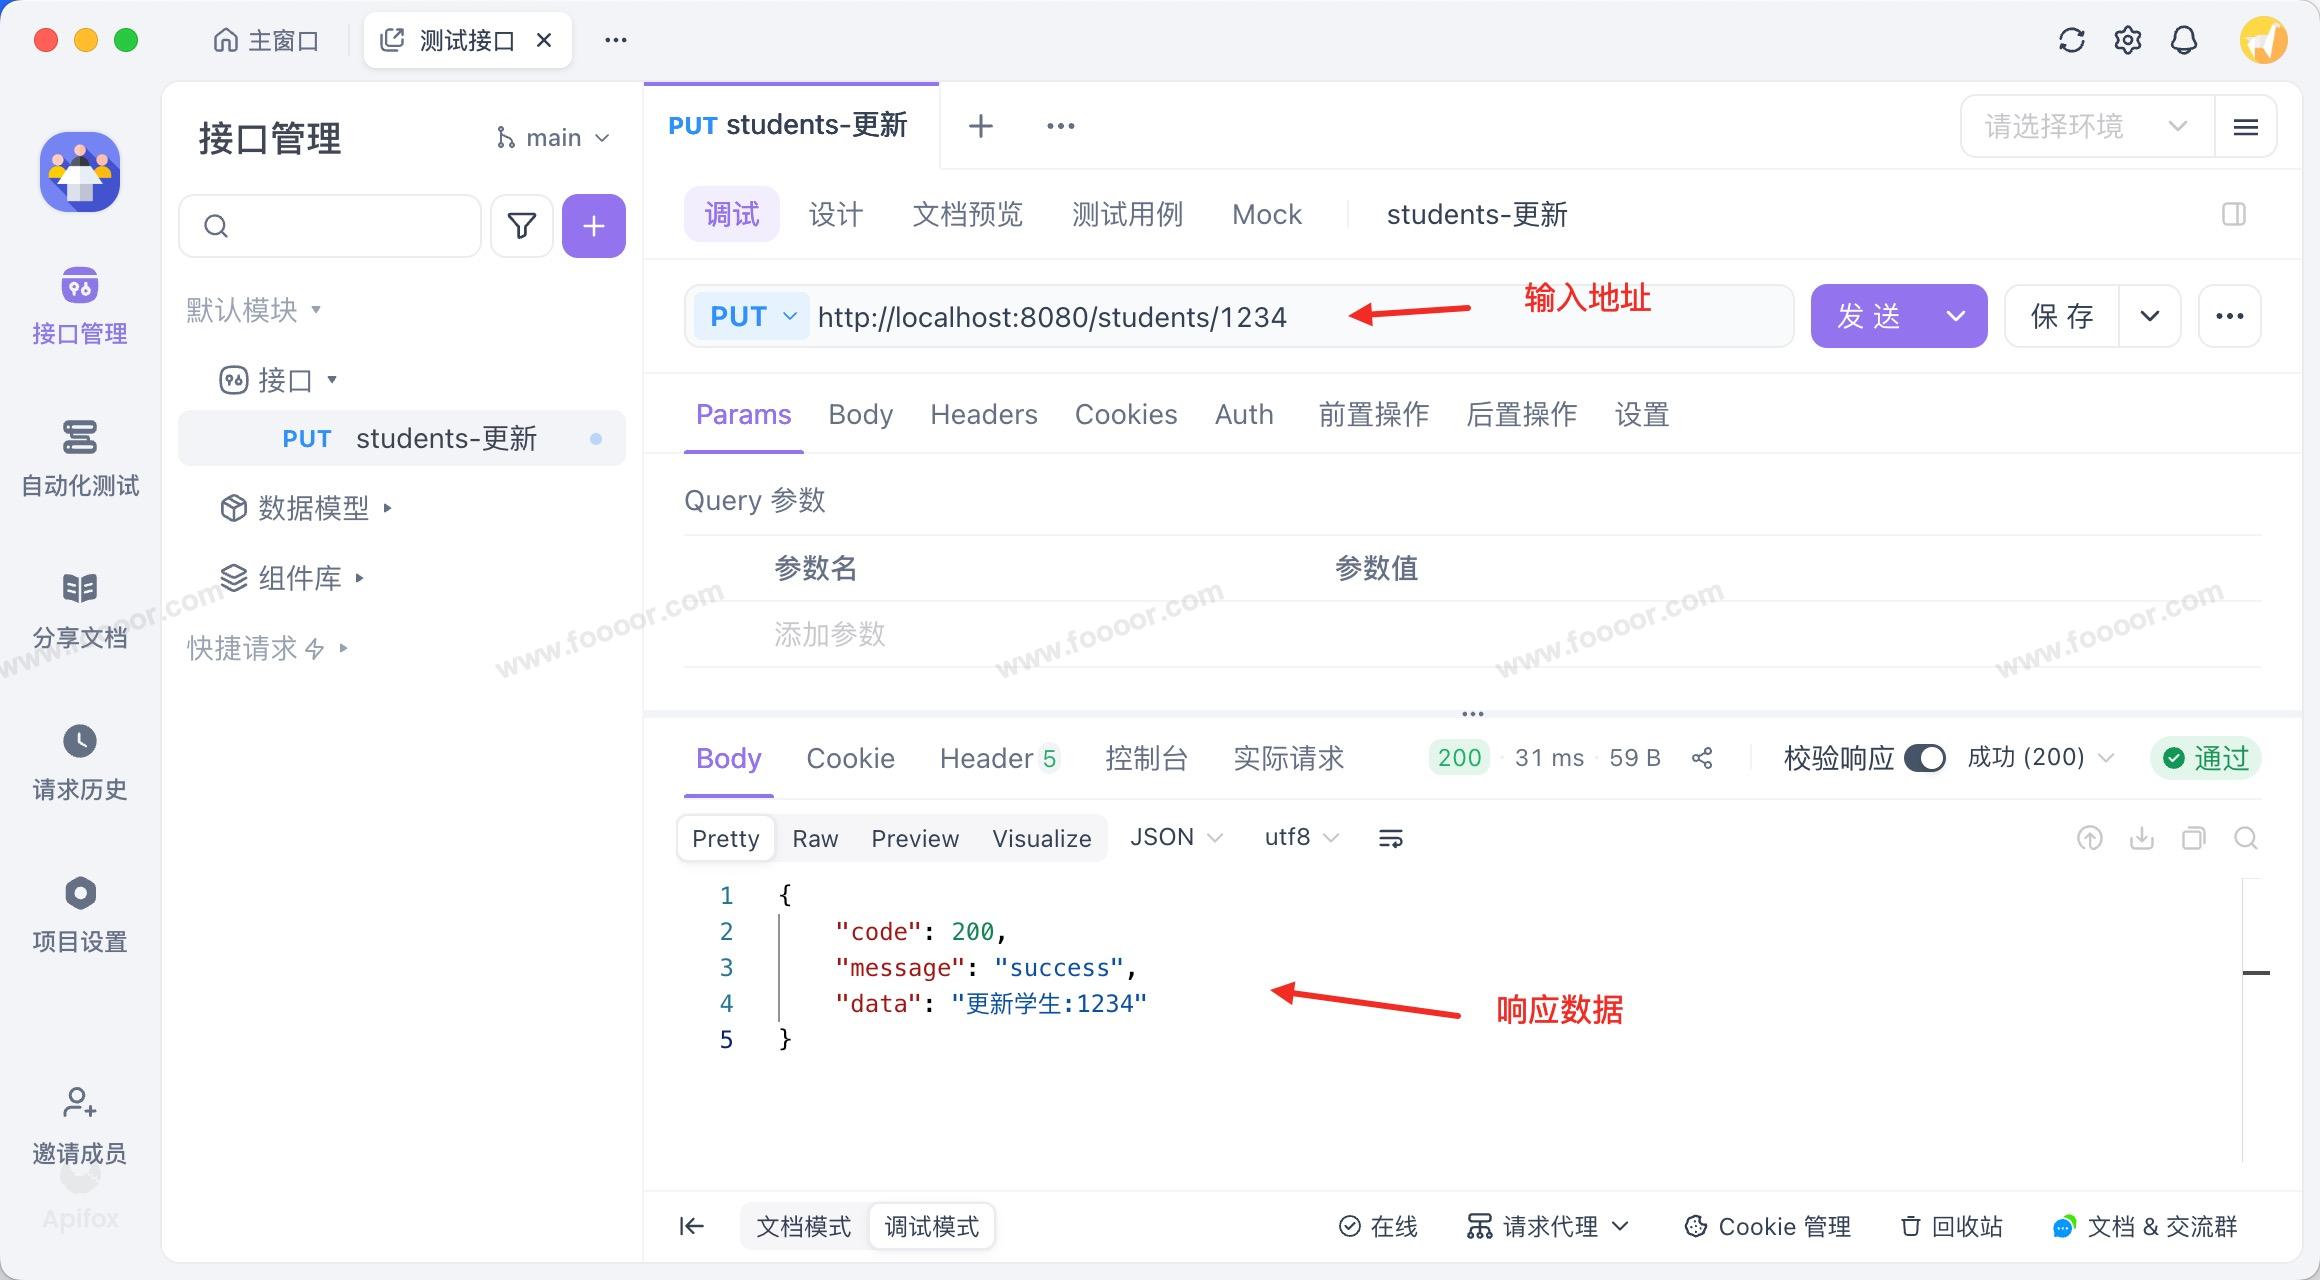
- 通过测试发现,确实可以请求到服务器的相关的接口了。
HTML 页面中的 form 表单只能发起 get 或 post 请求,如果在网页中发起 put、delete 等请求,需要使用 AJAX 来实现。
在实际前端的开发中,我们会使用
axios等工具来发送 HTTP 请求。
4.3 @RequestMapping
上面的 @GetMapping、 @PostMapping 、@PutMapping、@DeleteMapping 注解需要使用对应的请求方法请求才能访问到对应的接口。
但是在实际的开发中,有时候很难以 Restful 风格实现所有接口,我们还会遇到一个接口支持既支持 Get 方式请求,又支持 Post 方式请求,那么我们可以使用@RequestMapping 注解。
其实 @GetMapping 、 @PostMapping 等注解,都是使用 @RequestMapping 注解实现的。
1 使用方法
举个栗子:
java
/**
 * 查询学生列表
 */
@RequestMapping("/students")
@ResponseBody
public Result listStudents() {
    return Result.success("查询学生列表");
}- 上面使用
@RequestMapping映射/students接口,那么将支持任何方法来请求(GET、POST、PUT、DELETE..)。
我们也可以指定 @RequestMapping 使用哪种方法来请求:
java
// 只支持Post方式来请求
@RequestMapping(value = "/students", method = RequestMethod.POST)

// 只支持Get和Post方式来请求,需要注意,不要和其他接口冲突
@RequestMapping(value = "/students", method = {RequestMethod.GET, RequestMethod.POST})
所以通过 @RequestMapping 可以实现前面四种注解。
| 注解 | 等价于 | 说明 |
|---|---|---|
@GetMapping | @RequestMapping(method = RequestMethod.GET) | 处理GET请求 |
@PostMapping | @RequestMapping(method = RequestMethod.POST) | 处理POST请求 |
@PutMapping | @RequestMapping(method = RequestMethod.PUT) | 处理PUT请求 |
@DeleteMapping | @RequestMapping(method = RequestMethod.DELETE) | 处理DELETE请求 |
当然为了使用方便,我们一般使用 @GetMapping、 @PostMapping 、@PutMapping、@DeleteMapping 注解。
2 在类上使用
@RequestMapping 注解除了可以放在方法上,还可以放在类上。
例如上面的请求路径:
java
@GetMapping("/students")
@GetMapping("/students/{id}")
@PostMapping("/students")
@PutMapping("/students/{id}")
@DeleteMapping("/students/{id}")
都是以相同的前缀 /students 开头,我们可以使用 @RequestMapping 将前缀 /students 放在类上,然后各个方法就可以省略前缀了。
我们的 Controller 可以这样写:
java
package com.foooor.hellospringmvc.controller;
import com.foooor.hellospringmvc.common.Result;
import org.springframework.stereotype.Controller;
import org.springframework.web.bind.annotation.*;

@Controller
@RequestMapping("/students") // 类级别映射前缀
public class StudentController {

    /**
     * 查询学生列表
     * GET /students
     */
    @GetMapping
    @ResponseBody
    public Result listStudents() {
        return Result.success("查询学生列表");
    }

    /**
     * 查询学生详情
     * GET /students/{id}
     */
    @GetMapping("/{id}")
    @ResponseBody
    public Result getStudentDetail(@PathVariable("id") Long id) {
        return Result.success("查询学生详情:" + id);
    }

    /**
     * 创建学生
     * POST /students
     */
    @PostMapping
    @ResponseBody
    public Result createStudent() {
        return Result.success("创建学生");
    }

    /**
     * 更新学生
     * PUT /students/{id}
     */
    @PutMapping("/{id}")
    @ResponseBody
    public Result updateStudent(@PathVariable("id") Long id) {
        return Result.success("更新学生:" + id);
    }

    /**
     * 删除学生
     * DELETE /students/{id}
     */
    @DeleteMapping("/{id}")
    @ResponseBody
    public Result deleteStudent(@PathVariable("id") Long id) {
        return Result.success("删除学生:" + id);
    }
}
4.4 RestController
我们现在是让每个接口都返回 JSON 数据,所以需要在每个方法上添加 @ResponseBody 注解。
但是每个方法都添加 @ResponseBody 注解会很麻烦,Spring 为我们提供了 @RestController 注解, @RestController = @Controller + @ResponseBody ,可以使用它来标识 Controller,它表示该类中的所有方法的返回值都以字符串返回,如果是对象默认会转换为 JSON 返回,而不是页面模板(后面再讲)。
举个栗子:
java
package com.foooor.hellospringmvc.controller;

import com.foooor.hellospringmvc.common.Result;
import org.springframework.web.bind.annotation.*;

@RestController
@RequestMapping("/students") // 类级别映射前缀
public class StudentController {

    /**
     * 查询学生列表
     * GET /students
     */
    @GetMapping
    public Result listStudents() {
        return Result.success("查询学生列表");
    }

    /**
     * 查询学生详情
     * GET /students/{id}
     */
    @GetMapping("/{id}")
    public Result getStudentDetail(@PathVariable("id") Long id) {
        return Result.success("查询学生详情:" + id);
    }

    // 其他,略...
}- 类上使用
@RestController代替@Controller,这样方法上的@ResponseBody注解就可以去掉了。
4.5 path映射规则
1 匹配多个路径
首先 @GetMapping 、@RequestMapping 都是可以映射多个多个请求路径的,其中的 path 呢 name 属性都是数组,而且两个属性是一样的效果,可以随意使用。
举个栗子:
java
@GetMapping(value = {"/student/list", "/students"})

@RequestMapping(value = {"/student/list", "/students"})

@RequestMapping(value = {"/student/list", "/students"}, method = {RequestMethod.GET, RequestMethod.POST})
2 通配符映射
SpringMVC 支持使用 Ant 风格通配符来进行路径匹配,常见通配符:
? —— 匹配 单个字符(仅限单个路径片段内的单字符)
- 例:
/file/?.txt可匹配/file/a.txt,但不匹配/file/ab.txt。
* —— 匹配 任意数量字符但不跨路径分隔符 /(匹配单个路径片段内的任意字符)
- 例:
/student/*可匹配/student/a、/student/abc,但不匹配/student/a/b。
** —— 匹配 任意数量的路径片段,可以跨多个层级(包括零层)
- 例:
/files/**可匹配/files/、/files/a、/files/a/b/c.txt等。
但是需要注意,** 左右不能出现其他字符,只能是 / 。