Appearance
SpringMVC教程 - 19 SSM整合
说实话,到这里不是很想讲了,因为现在基本不会使用这种方式了,直接使用 SpringBoot 就完事了。
SSM整合,就是整合:Spring + SpringMVC + MyBatis。下面就使用全注解的方式进行整合,在上一章的基础上,进行整合。
19.1 添加依赖
在上一章的基础上,在pom.xml文件中添加依赖:
xml
<!-- AOP相关 引入spring aop依赖 -->
<dependency>
    <groupId>org.springframework</groupId>
    <artifactId>spring-aop</artifactId>
    <version>6.2.9</version>
</dependency>

<!-- AOP相关 引入spring aspects依赖 -->
<dependency>
    <groupId>org.springframework</groupId>
    <artifactId>spring-aspects</artifactId>
    <version>6.2.9</version>
</dependency>

<!-- 引入spring jdbc依赖,用于数据库操作 -->
<dependency>
    <groupId>org.springframework</groupId>
    <artifactId>spring-jdbc</artifactId>
    <version>6.2.9</version>
</dependency>

<!-- 引入mysql驱动依赖,用于连接mysql数据库 -->
<dependency>
    <groupId>com.mysql</groupId>
    <artifactId>mysql-connector-j</artifactId>
    <version>9.5.0</version>
</dependency>

<!-- 引入druid依赖,提供数据库连接池 -->
<dependency>
    <groupId>com.alibaba</groupId>
    <artifactId>druid</artifactId>
    <version>1.2.27</version>
</dependency>

<!-- mybatis 驱动 -->
<dependency>
    <groupId>org.mybatis</groupId>
    <artifactId>mybatis</artifactId>
    <version>3.5.19</version>
</dependency>

<!-- mybatis 与 spring 集成依赖 -->
<dependency>
    <groupId>org.mybatis</groupId>
    <artifactId>mybatis-spring</artifactId>
    <version>3.0.5</version>
</dependency>spring-webmvc会自动引入spring-beans / spring-core / spring-context。spring-jdbc会自动引入spring-tx。
19.2 配置MyBatis
首先整合 Spring + MyBatis 。
1 数据库配置
首先,我们需要配置数据库连接。创建一个数据库配置文件src/main/resources/jdbc.properties:
properties
# 数据库连接信息
jdbc.driver=com.mysql.cj.jdbc.Driver
jdbc.url=jdbc:mysql://localhost:3306/foooor_db?useUnicode=true&characterEncoding=utf8&serverTimezone=Asia/Shanghai
jdbc.username=root
jdbc.password=123456

# 连接池配置
druid.initialSize=5
druid.minIdle=5
druid.maxActive=20
druid.maxWait=60000
2 MyBatis配置类
创建 MyBatis 的配置类 MyBatisConfig.java ,在其中做如下配置:
- 配置数据源;
- 配置
SqlSessionFactory - 配置 Mybatis 扫描的包和其他的配置;
java
package com.foooor.helloweb.config;

import com.alibaba.druid.pool.DruidDataSource;
import org.mybatis.spring.SqlSessionFactoryBean;
import org.mybatis.spring.annotation.MapperScan;
import org.springframework.beans.factory.annotation.Value;
import org.springframework.context.annotation.Bean;
import org.springframework.context.annotation.Configuration;
import org.springframework.core.io.support.PathMatchingResourcePatternResolver;

import javax.sql.DataSource;
import java.io.IOException;

@Configuration
@MapperScan("com.foooor.helloweb.mapper")  // 扫描Mapper接口
public class MyBatisConfig {

    @Value("${jdbc.driver}")
    private String driver;

    @Value("${jdbc.url}")
    private String url;

    @Value("${jdbc.username}")
    private String username;

    @Value("${jdbc.password}")
    private String password;

    @Value("${druid.initialSize}")
    private Integer initialSize;

    @Value("${druid.minIdle}")
    private Integer minIdle;

    @Value("${druid.maxActive}")
    private Integer maxActive;

    @Value("${druid.maxWait}")
    private Long maxWait;

    /**
     * 配置数据源
     */
    @Bean
    public DataSource dataSource() {
        DruidDataSource dataSource = new DruidDataSource();
        dataSource.setDriverClassName(driver);
        dataSource.setUrl(url);
        dataSource.setUsername(username);
        dataSource.setPassword(password);
        dataSource.setInitialSize(initialSize);
        dataSource.setMinIdle(minIdle);
        dataSource.setMaxActive(maxActive);
        dataSource.setMaxWait(maxWait);
        return dataSource;
    }

    /**
     * 配置SqlSessionFactory
     */
    @Bean
    public SqlSessionFactoryBean sqlSessionFactory(DataSource dataSource) throws IOException {
        SqlSessionFactoryBean factoryBean = new SqlSessionFactoryBean();
        factoryBean.setDataSource(dataSource);
        // 设置实体类包路径
        factoryBean.setTypeAliasesPackage("com.foooor.helloweb.pojo");

        // 设置Mapper映射文件路径
        PathMatchingResourcePatternResolver resolver = new PathMatchingResourcePatternResolver();
        factoryBean.setMapperLocations(resolver.getResources("classpath:mappers/*.xml"));

        // MyBatis 原生 Configuration
        org.apache.ibatis.session.Configuration configuration =
                new org.apache.ibatis.session.Configuration();
        // 开启下划线 转 驼峰命名
        configuration.setMapUnderscoreToCamelCase(true);
        factoryBean.setConfiguration(configuration);

        return factoryBean;
    }
}
19.3 修改SpringMVC
java
@Configuration
// 1.配置组件扫描
@ComponentScan(basePackages = "com.foooor.helloweb.controller")
// 2.开启注解驱动
@EnableWebMvc
public class SpringMvcConfig implements WebMvcConfigurer {
    //...略
}- 这里修改 SpringMvcConfig 只扫描 controller。
在进行 SSM(Spring + Spring MVC + MyBatis)集成的时候,涉及到两个 Spring IoC 容器: Root 容器 和 MVC 容器。Spring MVC 采用“父子容器(Parent–Child Context)”设计,Root 容器通常由 SpringConfig 配置,负责非 Web 的核心 Bean,MVC 容器由DispatcherServlet 创建,通常由 SpringMvcConfig 配置,负责 Web 相关的 Bean。MVC 容器可以访问 Root 容器中的 Bean,Root 容器 不能 访问 MVC 容器中的 Bean。Spring MVC 使用两个 IoC 容器,是为了分层、解耦和可扩展。
所以上面配置 SpringMVC 只扫描 controller 层。
19.4 配置Spring
创建 Spring 的配置类 SpringConfig.java:
java
package com.foooor.helloweb.config;

import org.springframework.context.annotation.*;
import org.springframework.jdbc.datasource.DataSourceTransactionManager;
import org.springframework.transaction.annotation.EnableTransactionManagement;
import org.springframework.stereotype.Controller;  // 别引错了
import javax.sql.DataSource;

@Configuration
@ComponentScan(
        basePackages = "com.foooor.helloweb",
        excludeFilters = @ComponentScan.Filter(
                type = FilterType.ANNOTATION,
                classes = Controller.class
        )
)
@PropertySource("classpath:jdbc.properties")
@Import(MyBatisConfig.class)  // 导入MyBatis配置类
@EnableTransactionManagement // 开启事务管理
public class SpringConfig {

    /**
     * 配置事务管理器
     */
    @Bean
    public DataSourceTransactionManager transactionManager(DataSource dataSource) {
        return new DataSourceTransactionManager(dataSource);
    }

}@ComponentScan:扫描指定包下的组件,排除了带有@Controller注解的类(这些由SpringMVC容器负责扫描);@Import:导入MyBatis的配置类。不需要导入SpringMvcConfig.class,以为是由 SpringMVC 容器负责。
19.5 配置WebAppInitializer
需要在 getRootConfigClasses() 方法中指定 Spring 根配置文件。
java
package com.foooor.helloweb.config;

import com.foooor.helloweb.filter.GlobalExceptionFilter;
import jakarta.servlet.Filter;
import jakarta.servlet.MultipartConfigElement;
import jakarta.servlet.ServletRegistration;
import org.springframework.context.annotation.Configuration;
import org.springframework.web.filter.CharacterEncodingFilter;
import org.springframework.web.filter.HiddenHttpMethodFilter;
import org.springframework.web.servlet.support.AbstractAnnotationConfigDispatcherServletInitializer;

import java.io.File;

/**
 * 代替web.xml,所以在这个类中编写的就是web.xml的配置
 */
@Configuration  // 标识是配置文件
public class WebAppInitializer extends AbstractAnnotationConfigDispatcherServletInitializer {

    /**
     * 根配置类,一般是spring的配置类
     */
    @Override
    protected Class<?>[] getRootConfigClasses() {
        // 指定spring的配置类
        return new Class<?>[] {SpringConfig.class};
    }

    /**
     * servlet配置类,一般是springmvc的配置类
     */
    @Override
    protected Class<?>[] getServletConfigClasses() {
        return new Class<?>[]{SpringMvcConfig.class};
    }

    /**
     * 配置DispatcherServlet的映射路径
     * @return
     */
    @Override
    protected String[] getServletMappings() {
        return new String[]{"/"};
    }

    /**
     * 配置web.xml中的过滤器
     */
    @Override
    protected Filter[] getServletFilters() {
        // 配置字符编码过滤器
        CharacterEncodingFilter characterEncodingFilter = new CharacterEncodingFilter();
        characterEncodingFilter.setEncoding("UTF-8");
        characterEncodingFilter.setForceEncoding(true);

        // 用于处理post请求中的_method参数,支持Restful风格的请求
        HiddenHttpMethodFilter hiddenHttpMethodFilter = new HiddenHttpMethodFilter();

        // 全局异常处理过滤器
        GlobalExceptionFilter globalExceptionFilter = new GlobalExceptionFilter();
        return new Filter[]{characterEncodingFilter, hiddenHttpMethodFilter, globalExceptionFilter};
    }

    /**
     * 配置文件上传的参数
     */
    @Override
    protected void customizeRegistration(ServletRegistration.Dynamic registration) {
        String tempDir = System.getProperty("java.io.tmpdir") + "/upload";
        File dir = new File(tempDir);
        if (!dir.exists()) {
            dir.mkdirs();
        }

        MultipartConfigElement multipartConfig = new MultipartConfigElement(
                tempDir,  // 临时目录(文件太大时会写入这里)
                50 * 1024 * 1024,     // 单个文件最大 50MB
                20 * 1024 * 1024,     // 设置整个表单上传的所有文件总大小的最大值 100MB
                2 * 1024 * 1024       // 超过 2MB 才写入磁盘
        );

        registration.setMultipartConfig(multipartConfig);
        registration.setLoadOnStartup(1);
    }
}- 只修改了
getRootConfigClasses()方法。
19.6 编写业务代码
现在整合基本完成了,下面就来完成之前 Student 的 CRUD 功能,之前只是保存到内存,现在将数据保存到数据库。
Controller 基本不用变,现在要修改的是 Service,通过 Service 调用 Mybatis 的 Mapper 类(Dao层),实现数据库的访问。
1 创建数据库表
首先准备数据库,和数据库中的 tb_student 表,用来保存学生表数据。
sql
CREATE DATABASE foooor_db;
USE foooor_db;

CREATE TABLE `tb_student` (
  `id` INT PRIMARY KEY AUTO_INCREMENT,
  `stu_no` VARCHAR(50) NULL comment '学号',
  `name` VARCHAR(50) NULL comment '姓名',
  `gender` VARCHAR(10) NULL comment '性别',
  `birthday` DATE NULL comment '出生日期',
  `create_time` DATETIME NULL comment '创建时间',
  `update_time` DATETIME NULL comment '更新时间'
) ENGINE=InnoDB DEFAULT CHARSET=utf8mb4;
2 创建实体类
创建学生实体类 Student.java,与数据库表进行映射:
java
package com.foooor.helloweb.pojo;

import lombok.Data;
import org.springframework.format.annotation.DateTimeFormat;

import java.time.LocalDate;
import java.time.LocalDateTime;

@Data
public class Student {
    private Long id;
    private String stuNo;
    private String name;
    private String gender;
    @DateTimeFormat(pattern = "yyyy-MM-dd")  // 指定前端提交的日期格式,同时用户数据回显
    private LocalDate birthday;
    private LocalDateTime createTime;
    private LocalDateTime updateTime;
}
3 创建Mapper接口
创建学生 Mapper 接口 StudentMapper.java:
java
package com.foooor.helloweb.mapper;

import com.foooor.helloweb.pojo.Student;
import org.apache.ibatis.annotations.Mapper;
import org.apache.ibatis.annotations.Select;
import java.util.List;

@Mapper
public interface StudentMapper {

    /**
     * 查询所有学生
     */
    @Select("SELECT * FROM tb_student")
    List<Student> findAll();

    /**
     * 根据ID查询学生
     */
    @Select("SELECT * FROM tb_student WHERE id = #{id}")
    Student findById(Long id);

    /**
     * 新增学生
     */
    int insert(Student student);

    /**
     * 更新学生
     */
    int update(Student student);

    /**
     * 删除学生
     */
    int delete(Long id);
}- 添加
@Mapper注解。
4 创建Mapper映射文件
创建 StudentMapper 的映射文件 src/main/resources/mappers/StudentMapper.xml:
xml
<?xml version="1.0" encoding="UTF-8" ?>
<!DOCTYPE mapper PUBLIC "-//mybatis.org//DTD Mapper 3.0//EN" "http://mybatis.org/dtd/mybatis-3-mapper.dtd">

<mapper namespace="com.foooor.helloweb.mapper.StudentMapper">

    <insert id="insert" parameterType="com.foooor.helloweb.pojo.Student">
        INSERT INTO tb_student (stu_no, name, gender, birthday, create_time, update_time)
        VALUES (#{stuNo}, #{name}, #{gender}, #{birthday}, #{createTime}, #{updateTime})
    </insert>

    <update id="update" parameterType="com.foooor.helloweb.pojo.Student">
        UPDATE tb_student SET
                        stu_no = #{stuNo},
                        name = #{name},
                        gender = #{gender},
                        birthday = #{birthday},
                        update_time = #{updateTime}
        WHERE id = #{id}
    </update>

    <delete id="delete" parameterType="Long">
        DELETE FROM tb_student WHERE id = #{id}
    </delete>
</mapper>
5 创建Service
创建学生服务接口 IStudentService.java:
java
package com.foooor.helloweb.service;

import com.foooor.helloweb.pojo.Student;
import java.util.List;

public interface IStudentService {

    /**
     * 查询所有学生
     */
    List<Student> findAll();

    /**
     * 根据ID查询学生
     */
    Student findById(Long id);

    /**
     * 新增学生
     */
    boolean addStudent(Student student);

    /**
     * 更新学生
     */
    boolean updateStudent(Student student);

    /**
     * 删除学生
     */
    boolean deleteStudent(Long id);
}
创建学生服务实现类 StudentServiceImpl.java:
java
package com.foooor.helloweb.service.impl;

import com.foooor.helloweb.mapper.StudentMapper;
import com.foooor.helloweb.pojo.Student;
import com.foooor.helloweb.service.IStudentService;
import org.springframework.beans.factory.annotation.Autowired;
import org.springframework.stereotype.Service;
import org.springframework.transaction.annotation.Transactional;

import java.time.LocalDateTime;
import java.util.List;

@Service
@Transactional  // 开启事务
public class StudentServiceImpl implements IStudentService {

    @Autowired
    private StudentMapper studentMapper;

    /**
     * 查询所有学生
     */
    @Override
    public List<Student> findAll() {
        return studentMapper.findAll();
    }

    /**
     * 根据ID查询学生
     */
    @Override
    public Student findById(Long id) {
        return studentMapper.findById(id);
    }

    /**
     * 新增学生
     */
    @Override
    public boolean addStudent(Student student) {
        LocalDateTime currentTime = LocalDateTime.now();
        student.setCreateTime(currentTime);
        student.setUpdateTime(currentTime);
        return studentMapper.insert(student) > 0;
    }

    /**
     * 更新学生
     */
    @Override
    public boolean updateStudent(Student student) {
        student.setUpdateTime(LocalDateTime.now());
        return studentMapper.update(student) > 0;
    }

    /**
     * 删除学生
     */
    @Override
    public boolean deleteStudent(Long id) {
        return studentMapper.delete(id) > 0;
    }
}
8 Controller类
创建学生 Controller 类 StudentController.java:
java
package com.foooor.helloweb.controller;

import com.foooor.helloweb.pojo.Student;
import com.foooor.helloweb.service.IStudentService;
import lombok.extern.slf4j.Slf4j;
import org.springframework.beans.factory.annotation.Autowired;
import org.springframework.stereotype.Controller;
import org.springframework.ui.Model;
import org.springframework.web.bind.annotation.GetMapping;
import org.springframework.web.bind.annotation.PathVariable;
import org.springframework.web.bind.annotation.PostMapping;
import org.springframework.web.bind.annotation.RequestMapping;

import java.util.List;

@Slf4j
@Controller
@RequestMapping("/views/students")
public class StudentController {

    @Autowired
    private IStudentService studentService;

    // 跳转到学生列表页
    @GetMapping
    public String list(Model model) {
        List<Student> studentList = studentService.findAll();
        model.addAttribute("studentList", studentList);  // 将数据传递给页面
        return "student/list";
    }

    // 跳转到新增页面
    @GetMapping("/add")
    public String create(Model model) {
        model.addAttribute("student", new Student());  // 空对象
        return "student/edit";
    }

    // 跳转到编辑页面
    @GetMapping("/edit/{id}")
    public String editForm(@PathVariable("id") Long id, Model model) {
        Student student = studentService.findById(id);
        model.addAttribute("student", student); // 将数据传递给页面,学生编辑时候的数据回显
        return "student/edit";
    }

    // 保存学生信息(新增或编辑)
    @PostMapping("/save")
    public String save(Student student) {
        if (student.getId() == null) {
            studentService.addStudent(student); // 新增
        } else {
            studentService.updateStudent(student); // 编辑
        }
        return "redirect:/views/students";  // 这里是重定向
    }

    // 删除学生
    @PostMapping("/delete/{id}")
    public String delete(@PathVariable("id") Long id) {
        studentService.deleteStudent(id);
        return "redirect:/views/students";  // 这里是重定向
    }
}- 这里注意一下,这里的接口我添加了一个
/views前缀,主要是后面还会集成 Restful API,后面为了方便区分接口和配置,知道就好
19.7 视图模板
还是之前的学生列表和学生信息编辑页面,针对字段做一下简单的修改,因为添加了几个字段。
在 webapp/WEB-INFO/student 目录下创建学生列表页面和编辑学生信息页面。
1 学生列表页面
html
<!DOCTYPE html>
<html xmlns:th="http://www.thymeleaf.org">
<head>
  <meta charset="UTF-8">
  <title>学生列表</title>
  <style>
    body {
      font-family: Arial, sans-serif;
      padding: 20px;
    }
    body h2 {
      text-align: center;
    }
    body a {
      width: 100px;
      display: block;
      text-align: center;
      margin: 20px auto;
    }
    table {
      width: 70%;
      border-collapse: collapse;
      margin: 20px auto;
    }
    th, td {
      border: 1px solid #aaa;
      padding: 8px 10px;
      text-align: left;
    }
    th {
      background-color: #eee;
    }
    td form {
      display: inline;
    }
  </style>
</head>

<body>
<h2>学生列表</h2>

<table>
  <tr>
    <th>序号</th>
    <th>学号</th>
    <th>姓名</th>
    <th>性别</th>
    <th>出生日期</th>
    <th>创建时间</th>
    <th>操作</th>
  </tr>
  <tr th:each="u, stat : ${studentList}">
    <td th:text="${stat.index + 1}"></td>
    <td th:text="${u.stuNo}"></td>
    <td th:text="${u.name}"></td>
    <td th:text="${u.gender}"></td>
    <td th:text="${u.birthday != null ? #temporals.format(u.birthday, 'yyyy-MM-dd') : ''}"></td>

    <td th:text="${u.createTime != null ? #temporals.format(u.createTime, 'yyyy-MM-dd HH:mm:ss') : ''}"></td>
    <td>
      <form th:action="@{/views/students/edit/{id}(id=${u.id})}" method="get">
        <button type="submit">编辑</button>
      </form>

      <form th:action="@{/views/students/delete/{id}(id=${u.id})}" method="post"
            onsubmit="return confirm('确定要删除该学生吗?');">
        <button type="submit">删除</button>
      </form>
    </td>
  </tr>
</table>

<a th:href="@{/views/students/add}">新增学生</a>

</body>
</html>
2 编辑学生信息页面
html
<!DOCTYPE html>
<html xmlns:th="http://www.thymeleaf.org">
<head>
<meta charset="UTF-8">
<title th:text="${student.id == null ? '新增学生' : '编辑学生'}"></title>
<style>
body {
font-family: Arial, sans-serif;
padding: 20px;
}
body h2 {
text-align: center;
}
body form {
width: 300px;
display: flex;
flex-direction: column;
gap: 10px;
margin: 0 auto;
}
label {
font-weight: bold;
}
input[type="text"], input[type="email"] {
padding: 6px;
border: 1px solid #ccc;
}
button {
padding: 6px;
background-color: #4CAF50;
color: white;
border: none;
cursor: pointer;
}
body a {
width: 100px;
display: block;
text-align: center;
margin: 20px auto;
}
</style>
</head>
<body>
<h2 th:text="${student.id == null ? '新增学生' : '编辑学生'}"></h2>
<!-- 根据是否有id判断是新增还是编辑,使用不同的action url -->
<form th:action="@{/views/students/save}" method="post" th:object="${student}">
<!-- 隐藏参数,新增时不需要id,编辑时需要id -->
<input type="hidden" th:field="*{id}">
<label>学号:</label>
<input type="text" th:field="*{stuNo}" required>
<label>姓名:</label>
<input type="text" th:field="*{name}" required>
<label>性别:</label>
<div class="gender-group">
<label>
<input type="radio" th:field="*{gender}" value="男"> 男
</label>
<label>
<input type="radio" th:field="*{gender}" value="女"> 女
</label>
</div>
<label>出生日期:</label>
<input type="date" th:field="*{birthday}">
<button type="submit">保存</button>
</form>
<a th:href="@{/students}">返回列表</a>
</body>
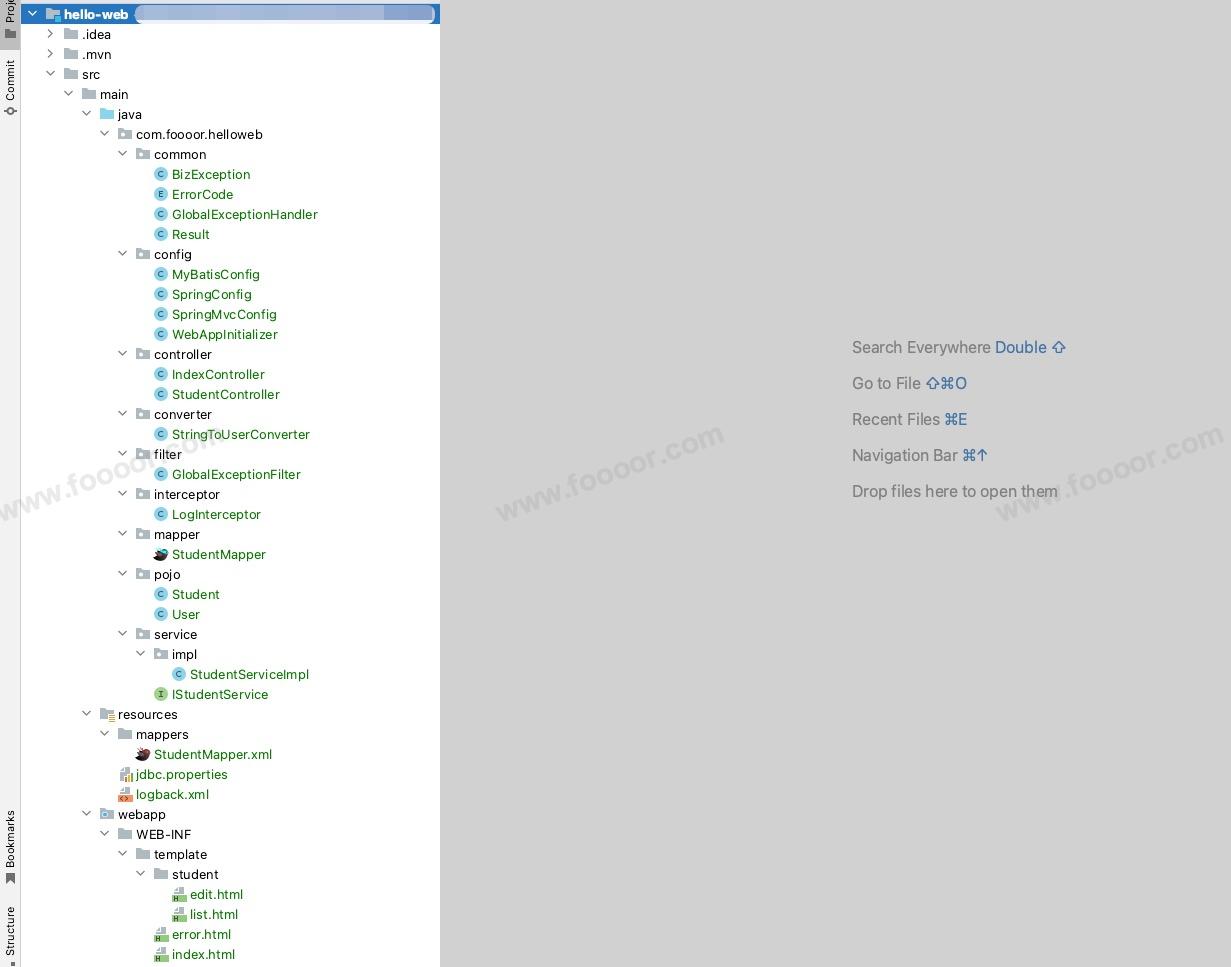
</html>19.8 项目结构
整个项目结构如下:
19.9 测试
1 启动项目
将项目部署到Tomcat服务器,启动服务器。
2 访问用户列表
在浏览器中访问http://localhost:8080/views/students,就可以添加数据了,那就可以看到用户列表数据了:
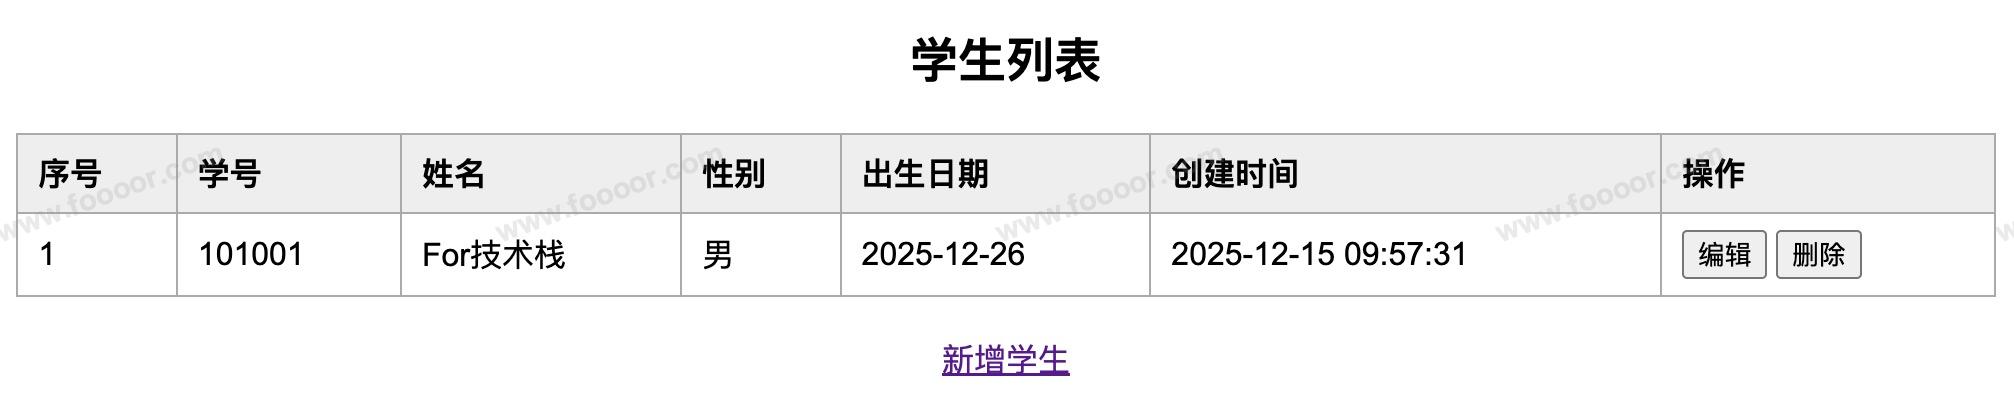
3 测试功能
测试添加、编辑、删除用户等功能,一切正常工作。
好了,使用 SpringBoot 吧,别在这浪费时间了!
内容未完......