Appearance
SpringMVC教程 - 7 Thymeleaf实现CRUD
在上一个章节,使用了 Thymeleaf 实现了一个 Helloworld 程序。
我们需要创建模板文件,这个模板文件就是要显示的页面,页面中需要显示数据的地方,使用 Thymeleaf 标签语法进行编写,最终会将 Controller 中设置的参数,绑定到模板文件中,生成 HTML 返回给浏览器。
下面来简单介绍一下 Thymeleaf 的语法,并实现一个简单的 CRUD(增删改查) 功能。
7.1 Thymeleaf语法与常用标签
在上一章的 Helloworld 页面中,通过 th:text 属性在 HTML 中显示 Controller 中传递的数据。Thymeleaf 没有发明新标签,而是在普通 HTML 标签中使用 th: 前缀属性来动态渲染,所以使用起来也比较简单。
下面介绍一下 Thymeleaf 的常用语法与标签。
1 输出文本
th:text 用于替换标签内的文本内容。
举个栗子:
html
<span th:text="${user.username}">默认用户名</span>Controller中可以传递基本数据类型、字符串,还可以传递对象,在页面可以直接通过对象访问其属性,渲染后:
html
<span>foooor</span>注意:Thymeleaf 会自动进行 HTML 转义,防止 XSS 攻击。如果你确定内容安全,可以使用 th:utext 输出未转义文本。
2 循环迭代
th:each 用来遍历集合或数组,类似于 Java 的 for-each。
举个栗子:
html
<tr th:each="user : ${userList}">
    <td th:text="${user.id}"></td>
    <td th:text="${user.username}"></td>
    <td th:text="${user.age}"></td>
</tr>
渲染后会生成多行 <tr>,每一行对应一个用户。
你也可以同时取索引:
html
<tr th:each="user, stat : ${userList}">
    <td th:text="${stat.index}">索引</td>
    <td th:text="${user.username}"></td>
</tr>
3 条件判断
th:if / th:unless 可以根据条件渲染标签内容。
举个栗子:
html
<p th:if="${user.vip}">尊贵的VIP用户</p>
<p th:unless="${user.vip}">普通用户</p>
只有条件成立的标签才会出现在最终 HTML 中。
th:unless="${user.vip}" 等价于 th:if="${!user.vip}" 。
4 动态路径
th:href、th:src 用于动态生成 URL。
举个栗子:
html
<!-- 有参数 -->
<a th:href="@{/users/{id}(id=${user.id})}">查看详情</a>

<!-- 没有参数 -->
<img th:src="@{/images/logo.png}" alt="logo">@{}表示 Thymeleaf 的 URL 表达式,里面可带参数、路径变量、查询参数等。/users/{id}表示 URL 模板;(id=${user.id})表示告诉 Thymeleaf 把模板中的{id}替换成user.id的值。
假设 user.id = 5,那么渲染后结果就是:
/users/5你也可以使用这样的方式:
html
<a th:href="@{'/users/' + ${user.id}}">查看详情</a>但下面的方式不行:
html
<a th:href="@{/users/${user.id}}">查看详情</a>还可以在 URL 中 附加查询参数(Query Parameter) 。
结构是:
html
@{/路径(参数名=值, 参数名2=值2, ...)}举个栗子:
html
<a th:href="@{/users(page=${pageNum})}">下一页</a>如果 pageNum = 2,渲染后就是:
html
<a href="/users?page=2">下一页</a>多个参数时:
html
<a th:href="@{/users(page=${pageNum}, size=${pageSize}, sort='name')}">下一页</a>假设 pageNum = 3 、pageSize = 10 、sort=name,渲染后为:
/users?page=3&size=10&sort=name5 表单绑定
th:action 指定表单提交地址,th:object 与 *{} 用于绑定对象属性。
举个栗子:
html
<form th:action="@{/users}" th:object="${user}" method="post">
    <input type="text" th:field="*{username}">
    <input type="number" th:field="*{age}">
    <button type="submit">提交</button>
</form>th:object="${user}"表示绑定一个对象;- 通过
th:field="*{username}"绑定对象的属性,会自动生成name / id / value / checked / selected等属性和值。 - 渲染后会生成一个标准的 HTML 表单。
如果模板如下:
html
<form th:object="${user}">
    <input type="text" th:field="*{username}">
  	<input type="radio" th:field="*{gender}" value="M"> 男
    <input type="radio" th:field="*{gender}" value="F"> 女
  	<input type="checkbox" th:field="*{hobbies}" value="music"> 音乐
		<input type="checkbox" th:field="*{hobbies}" value="reading"> 阅读
		<input type="checkbox" th:field="*{hobbies}" value="sports"> 体育
    <select th:field="*{city}">
        <option value="bj">北京</option>
        <option value="sh">上海</option>
    </select>
</form>
假设后端 user 数据如下:
user.username = "Tom";
user.gender = "M";
user.hobbies = ["music", "sports"];
user.city = "sh";
渲染后的最终 HTML:
html
<form>
    <input type="text" name="username" id="username" value="Tom">

    <input type="radio" name="gender" id="gender1" value="M" checked> 男
    <input type="radio" name="gender" id="gender2" value="F"> 女

    <input type="checkbox" name="hobbies" id="hobbies1" value="music" checked> 音乐
    <input type="checkbox" name="hobbies" id="hobbies2" value="reading"> 阅读
    <input type="checkbox" name="hobbies" id="hobbies3" value="sports" checked> 体育

    <select name="city" id="city">
        <option value="bj">北京</option>
        <option value="sh" selected>上海</option>
    </select>
</form>
6 选择状态
th:value、th:checked、th:selected 用于设置输入控件的状态。
举个栗子:
html
<input type="text" th:value="${user.username}">
<input type="checkbox" th:checked="${user.active}">
<select>
    <option th:each="r : ${roles}"
            th:value="${r.id}"
            th:text="${r.name}"
            th:selected="${r.id == user.roleId}">
    </option>
</select>
7 模板复用
Thymeleaf 支持布局与片段复用。
举个栗子:
定义一个公共页头:
html
<!-- fragments/header.html -->
<div th:fragment="header">
    <h1>用户管理系统</h1>
</div>
在页面中引入:
html
<div th:replace="fragments/header :: header"></div>th:replace表示完全替换当前标签(上面样例是 div 标签);th:include表示只将片段内容插入当前标签内部。
8 多分支判断
th:switch / th:case 可以用于多分支判断。
举个栗子:
html
<div th:switch="${user.role}">
    <p th:case="'admin'">管理员</p>
    <p th:case="'user'">普通用户</p>
    <p th:case="*">未知角色</p>
</div>
9 定义局部变量
在模板内定义临时变量,可以方便重复使用。
举个栗子:
html
<div th:with="total=${userList.size()}">
    <p>共有 <span th:text="${total}"></span> 个用户</p>
</div>
10 #date
#dates 用于 java.util.Date 体系的时间对象格式化的工具对象。支持 java.util.Date 和 java.util.Calendar 对象的格式化。
举个栗子:
后端有属性:
java
public class User {
    private Date createTime;
}
在模板文件中对 createTime 进行格式化显示:
html
<td th:text="${#dates.format(user.createTime, 'yyyy-MM-dd HH:mm:ss')}"></td>11 #temporals
#temporals 专门用于对 Java 8 时间对象进行格式化,支持如下对象的格式化:
LocalDateLocalDateTimeLocalTimeZonedDateTimeOffsetDateTime
举个栗子:
java
public class User {
    private LocalDate birthday;
    private LocalDateTime createTime;
}
在模板文件中,使用 #temporals 进行格式化:
html
<td th:text="${#temporals.format(user.birthday, 'yyyy-MM-dd')}"></td>

<td th:text="${#temporals.format(user.createTime, 'yyyy-MM-dd HH:mm:ss')}"></td>
12 th:inline="javascript"
13 其它有用标签
通过使用 Thymeleaf 标签,我们可以在标签中使用动态数据,实现动态渲染。
| 标签 | 作用 |
|---|---|
th:id | 设置 id 属性 |
th:classappend | 追加 CSS 类 |
th:style | 设置内联样式 |
th:attr | 动态设置任意属性,如 th:attr="title=${user.username}" |
th:remove | 控制是否删除标签(例如开发环境下隐藏某块内容) |
7.2 实现一个简单的CRUD
在上一章 Thymeleaf 的 Helloworld 的基础上,继续实现功能。
这里我就不使用数据库了,所有数据都是在 Controller 中进行模拟的,如果想使用数据库,可以参考 Spring 教程,集成 JdbcTemplate,并使用声明式事务。
1 编写Model层
正常的项目一般使用三层结构 Controller --> Service --> Dao ,其中 Service 和 Dao 都属于 MVC 中的 Model 层,是对 Model 层的细化, Service 负责业务逻辑, Dao 负责数据库数据的访问。
首先编写业务对象,因为 CRUD 是针对 Student 数据的,所以创建 Student.java :
java
package com.foooor.hellospringmvc.pojo;

import lombok.Data;

@Data
public class Student {

    private Long id;
    private String stuNo;
    private String name;
    private Integer age;

}
编写 Service ,提供增删改查的方法,创建接口 IStudentService.java :
java
package com.foooor.hellospringmvc.service;
import com.foooor.hellospringmvc.pojo.Student;
import java.util.List;

public interface IStudentService {
    /**
     * 查找所有学生
     */
    List<Student> findAll();

    /**
     * 根据ID查找学生
     */
    Student findById(Long id);

    /**
     * 保存学生
     */
    void save(Student student);

    /**
     * 更新学生
     */
    void update(Student student);

    /**
     * 删除学生
     */
    void delete(Long id);
}
这里我在 Service 中模拟数据,所以编写实现类,数据都放在一个Map中维护:
java
package com.foooor.hellospringmvc.service;

import com.foooor.hellospringmvc.pojo.Student;
import org.springframework.stereotype.Service;
import java.util.ArrayList;
import java.util.HashMap;
import java.util.List;
import java.util.Map;

@Service
public class StudentServiceImpl implements IStudentService {
    private final Map<Long, Student> students = new HashMap<>();
    private Long nextId = 1L;

    /**
     * 查找所有学生
     */
    @Override
    public List<Student> findAll() {
        return new ArrayList<>(students.values());
    }

    /**
     * 根据ID查找学生
     */
     @Override
    public Student findById(Long id) {
        return students.get(id);
    }

    /**
     * 保存学生
     */
    @Override
    public void save(Student student) {
        student.setId(nextId++);
        students.put(student.getId(), student);
    }

    /**
     * 更新学生
     */
    @Override
    public void update(Student student) {
        students.put(student.getId(), student);
    }

    /**
     * 删除学生
     */
    @Override
    public void delete(Long id) {
        students.remove(id);
    }
}- 如果需要保存到数据库,可以参考 Spring 教程中的 JdbcTemplate 章节。
2 编写Controller层
编写 StudentController.java,如下:
java
package com.foooor.hellospringmvc.controller;

import com.foooor.hellospringmvc.pojo.Student;
import com.foooor.hellospringmvc.service.IStudentService;
import lombok.extern.slf4j.Slf4j;
import org.springframework.beans.factory.annotation.Autowired;
import org.springframework.stereotype.Controller;
import org.springframework.ui.Model;
import org.springframework.web.bind.annotation.GetMapping;
import org.springframework.web.bind.annotation.PathVariable;
import org.springframework.web.bind.annotation.PostMapping;
import org.springframework.web.bind.annotation.RequestMapping;
import java.util.List;

@Slf4j
@Controller
@RequestMapping("/students")
public class StudentController {

    @Autowired
    private IStudentService studentService;

    // 跳转到学生列表页
    @GetMapping
    public String list(Model model) {
        List<Student> studentList = studentService.findAll();
        model.addAttribute("studentList", studentList);  // 将数据传递给页面
        return "student/list";
    }

    // 跳转到新增页面
    @GetMapping("/add")
    public String create(Model model) {
        model.addAttribute("student", new Student());  // 空对象
        return "student/edit";
    }

    // 跳转到编辑页面
    @GetMapping("/edit/{id}")
    public String editForm(@PathVariable("id") Long id, Model model) {
        Student student = studentService.findById(id);
        model.addAttribute("student", student); // 将数据传递给页面,学生编辑时候的数据回显
        return "student/edit";
    }

    // 保存学生信息(新增或编辑)
    @PostMapping("/save")
    public String save(Student student) {
        if (student.getId() == null) {
            studentService.save(student); // 新增
        } else {
            studentService.update(student); // 编辑
        }
        return "redirect:/students";  // 这里是重定向
    }

    // 删除学生
    @PostMapping("/delete/{id}")
    public String delete(@PathVariable("id") Long id) {
        studentService.delete(id);
        return "redirect:/students";  // 这里是重定向
    }
}
这里需要说明一下,画一下简单的流程图:

首先通过 /students 跳转到学生列表页面,然后点击 添加 按钮,请求 /students/add ,跳转到编辑页面,在编辑页面填写信息后,点击 保存 按钮,请求 /students/save 保存数据成功,此时需要使用 redirect:/students , 重定向 到 /students ,让浏览器重新访问 /students ,然后跳转到列表页面。这里保存以后,不能直接跳转到 list.html 视图,因为在 save 方法中,没有获取学生数据传递给页面 List<Student> studentList = studentService.findAll(); ,所以需要让浏览器重新访问 /students ,获取到学生列表信息再进入 list.html 视图。
关于重定向的细节,下一个小节再讲。
3 编写页面
这里涉及到两个页面,一个是列表页面,一个是编辑页面,新增和编辑共用一个页面,如果有 id 就是编辑。
在 webapp/WEB-INF/template/student (没有目录就创建)目录下创建两个模板页面。
list.html :
页面中添加了简单的 CSS 样式,让页面好看一丢对。
html
<!DOCTYPE html>
<html xmlns:th="http://www.thymeleaf.org">
<head>
  <meta charset="UTF-8">
  <title>学生列表</title>
  <style>
    body {
      font-family: Arial, sans-serif;
      padding: 20px;
    }
    body h2 {
      text-align: center;
    }
    body a {
      width: 100px;
      display: block;
      text-align: center;
      margin: 20px auto;
    }
    table {
      width: 70%;
      border-collapse: collapse;
      margin: 20px auto;
    }
    th, td {
      border: 1px solid #aaa;
      padding: 8px 10px;
      text-align: left;
    }
    th {
      background-color: #eee;
    }
    td form {
      display: inline;
    }
  </style>
</head>

<body>
<h2>学生列表</h2>

<table>
  <tr>
    <th>序号</th>
    <th>学号</th>
    <th>姓名</th>
    <th>年龄</th>
    <th>操作</th>
  </tr>
  <tr th:each="u, stat : ${studentList}">
    <td th:text="${stat.index + 1}"></td>
    <td th:text="${u.stuNo}"></td>
    <td th:text="${u.name}"></td>
    <td th:text="${u.age}"></td>
    <td>
      <form th:action="@{/students/edit/{id}(id=${u.id})}" method="get">
        <button type="submit">编辑</button>
      </form>

      <!-- 删除 -->
      <form th:action="@{/students/delete/{id}(id=${u.id})}" method="post"
            onsubmit="return confirm('确定要删除该学生吗?');">
        <button type="submit">删除</button>
      </form>
    </td>
  </tr>
</table>

<a th:href="@{/students/add}">新增学生</a>

</body>
</html>- 列表页面主要使用
th:each遍历 Controller 传递的数据。
edit.html
html
<!DOCTYPE html>
<html xmlns:th="http://www.thymeleaf.org">
<head>
  <meta charset="UTF-8">
  <title th:text="${student.id == null ? '新增学生' : '编辑学生'}"></title>
  <style>
    body {
      font-family: Arial, sans-serif;
      padding: 20px;
    }
    body h2 {
      text-align: center;
    }
    body form {
      width: 300px;
      display: flex;
      flex-direction: column;
      gap: 10px;
      margin: 0 auto;
    }
    label {
      font-weight: bold;
    }
    input[type="text"], input[type="email"] {
      padding: 6px;
      border: 1px solid #ccc;
    }
    button {
      padding: 6px;
      background-color: #4CAF50;
      color: white;
      border: none;
      cursor: pointer;
    }
    body a {
      width: 100px;
      display: block;
      text-align: center;
      margin: 20px auto;
    }
  </style>
</head>
<body>

<h2 th:text="${student.id == null ? '新增学生' : '编辑学生'}"></h2>

<form th:action="@{/students/save}" method="post" th:object="${student}">
  <input type="hidden" th:field="*{id}">

  <label>学号:</label>
  <input type="text" th:field="*{stuNo}" required>

  <label>姓名:</label>
  <input type="text" th:field="*{name}" required>

  <label>年龄:</label>
  <input type="number" th:field="*{age}" required>

  <button type="submit">保存</button>
</form>

<a th:href="@{/students}">返回列表</a>

</body>
</html>- 编辑页面主要是编辑表单信息,并提交给 Controller。
- 编辑和新增是共用页面的,如果是编辑,会有
student.id数据,其他的数据也会回显。
4 测试
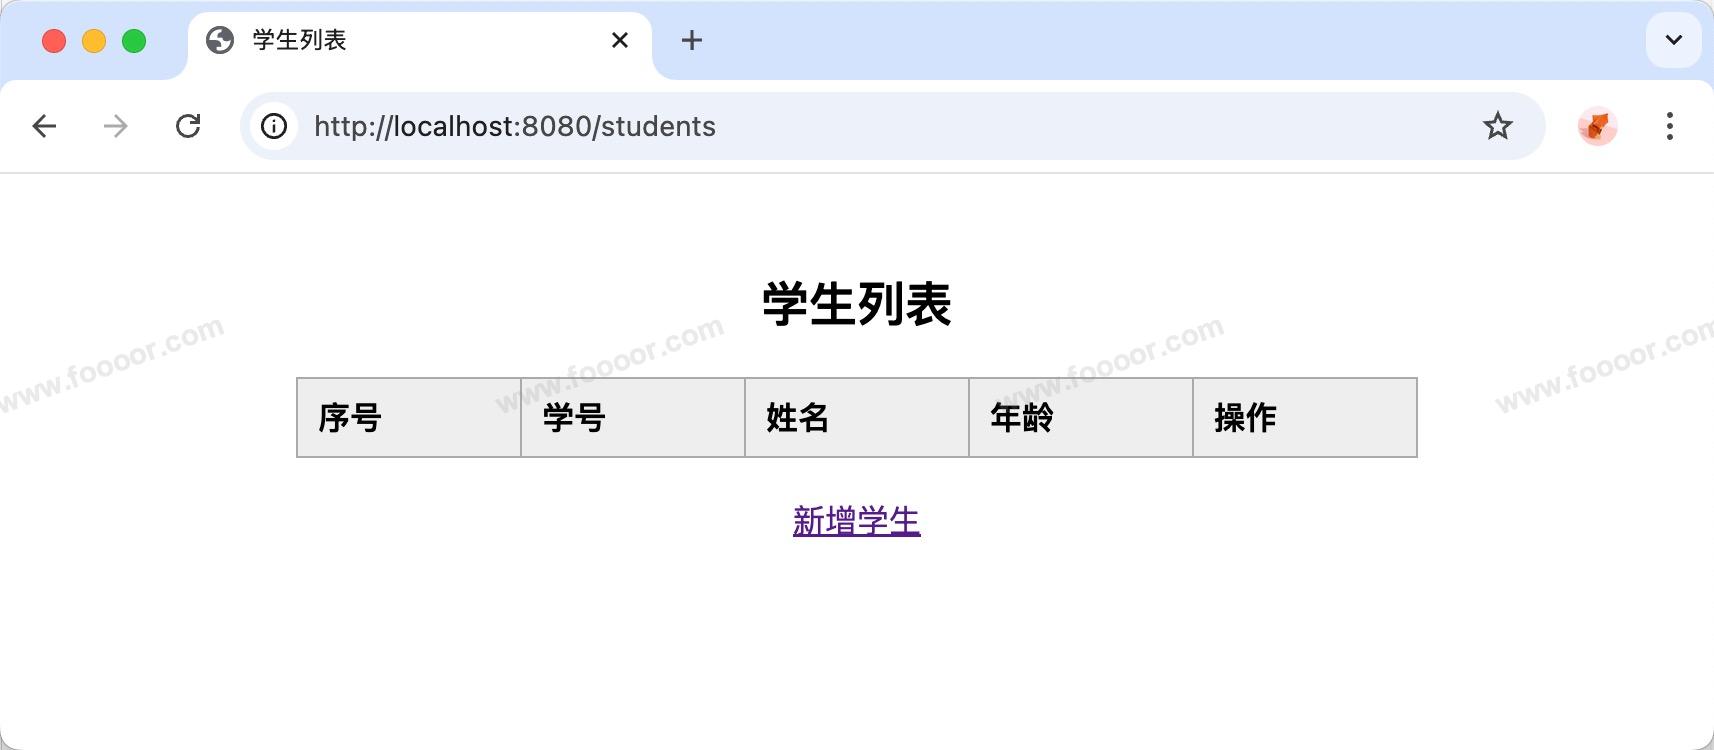
启动项目,访问 http://localhost:8080/students ,显示如下:
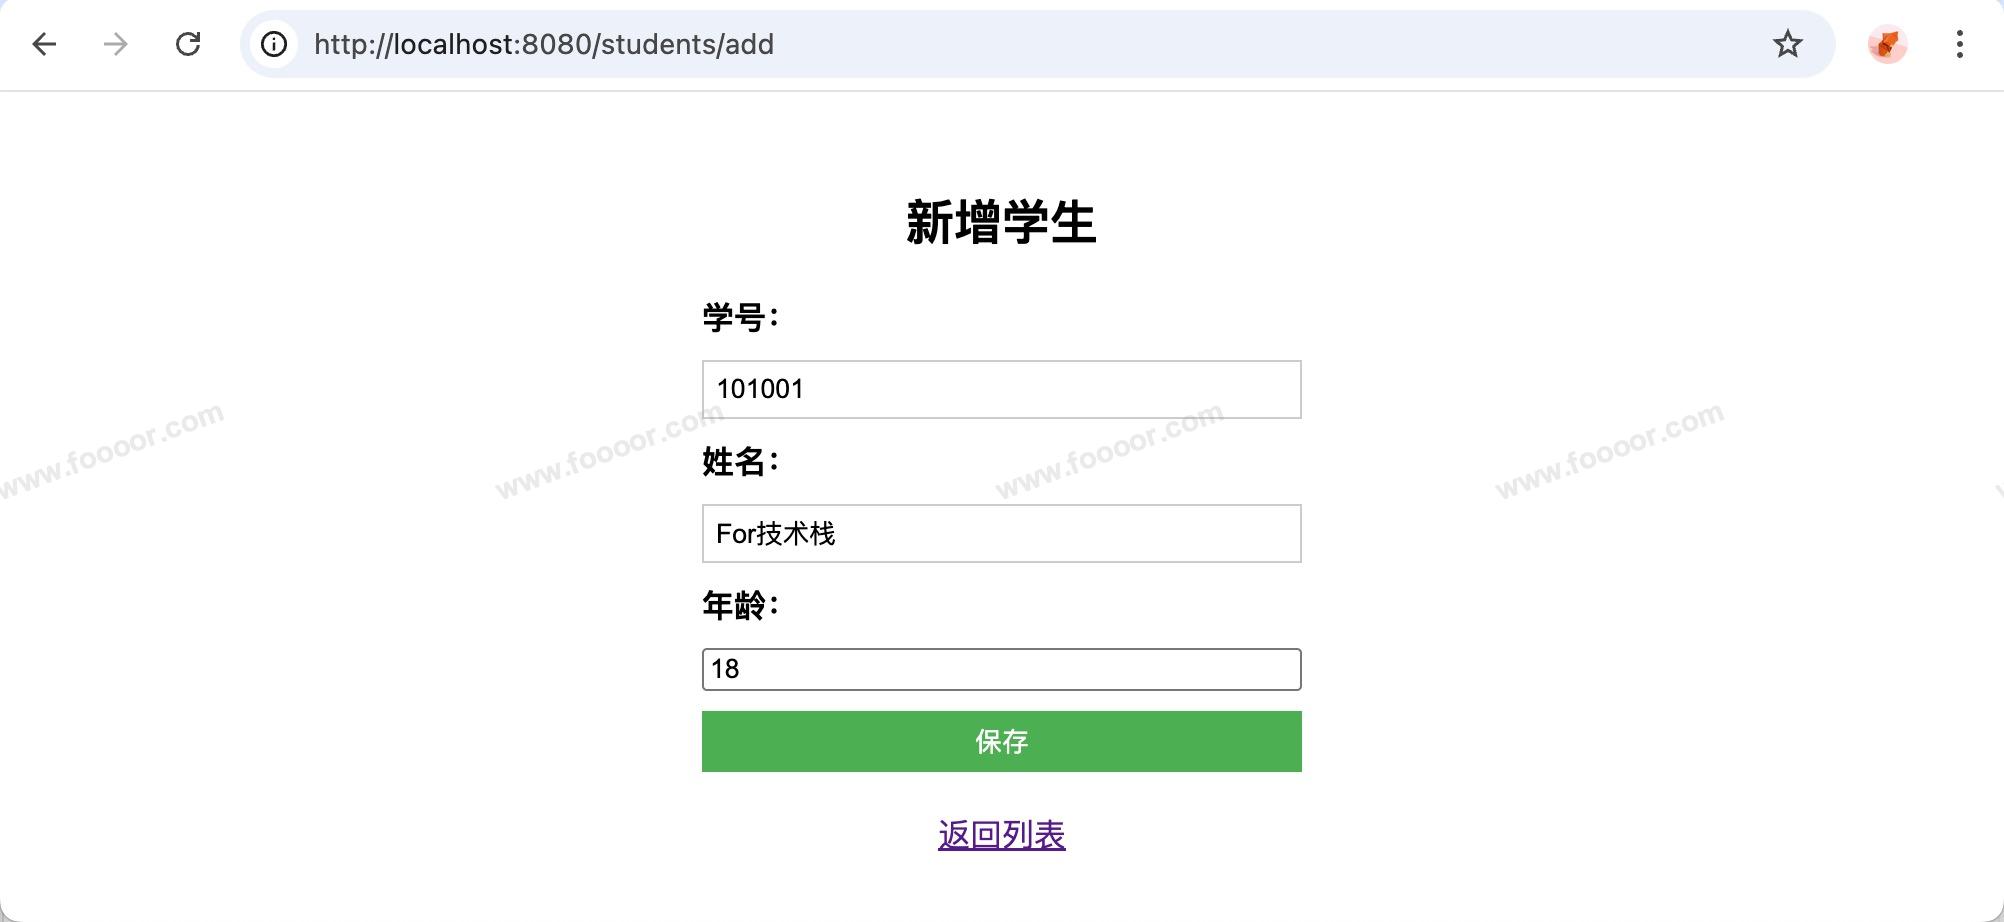
点击新增学生,跳转到新增页面:
填写信息并保存后,跳转到列表页面:
已经完成了一个简单的 CRUD 了!
代码结构如下:
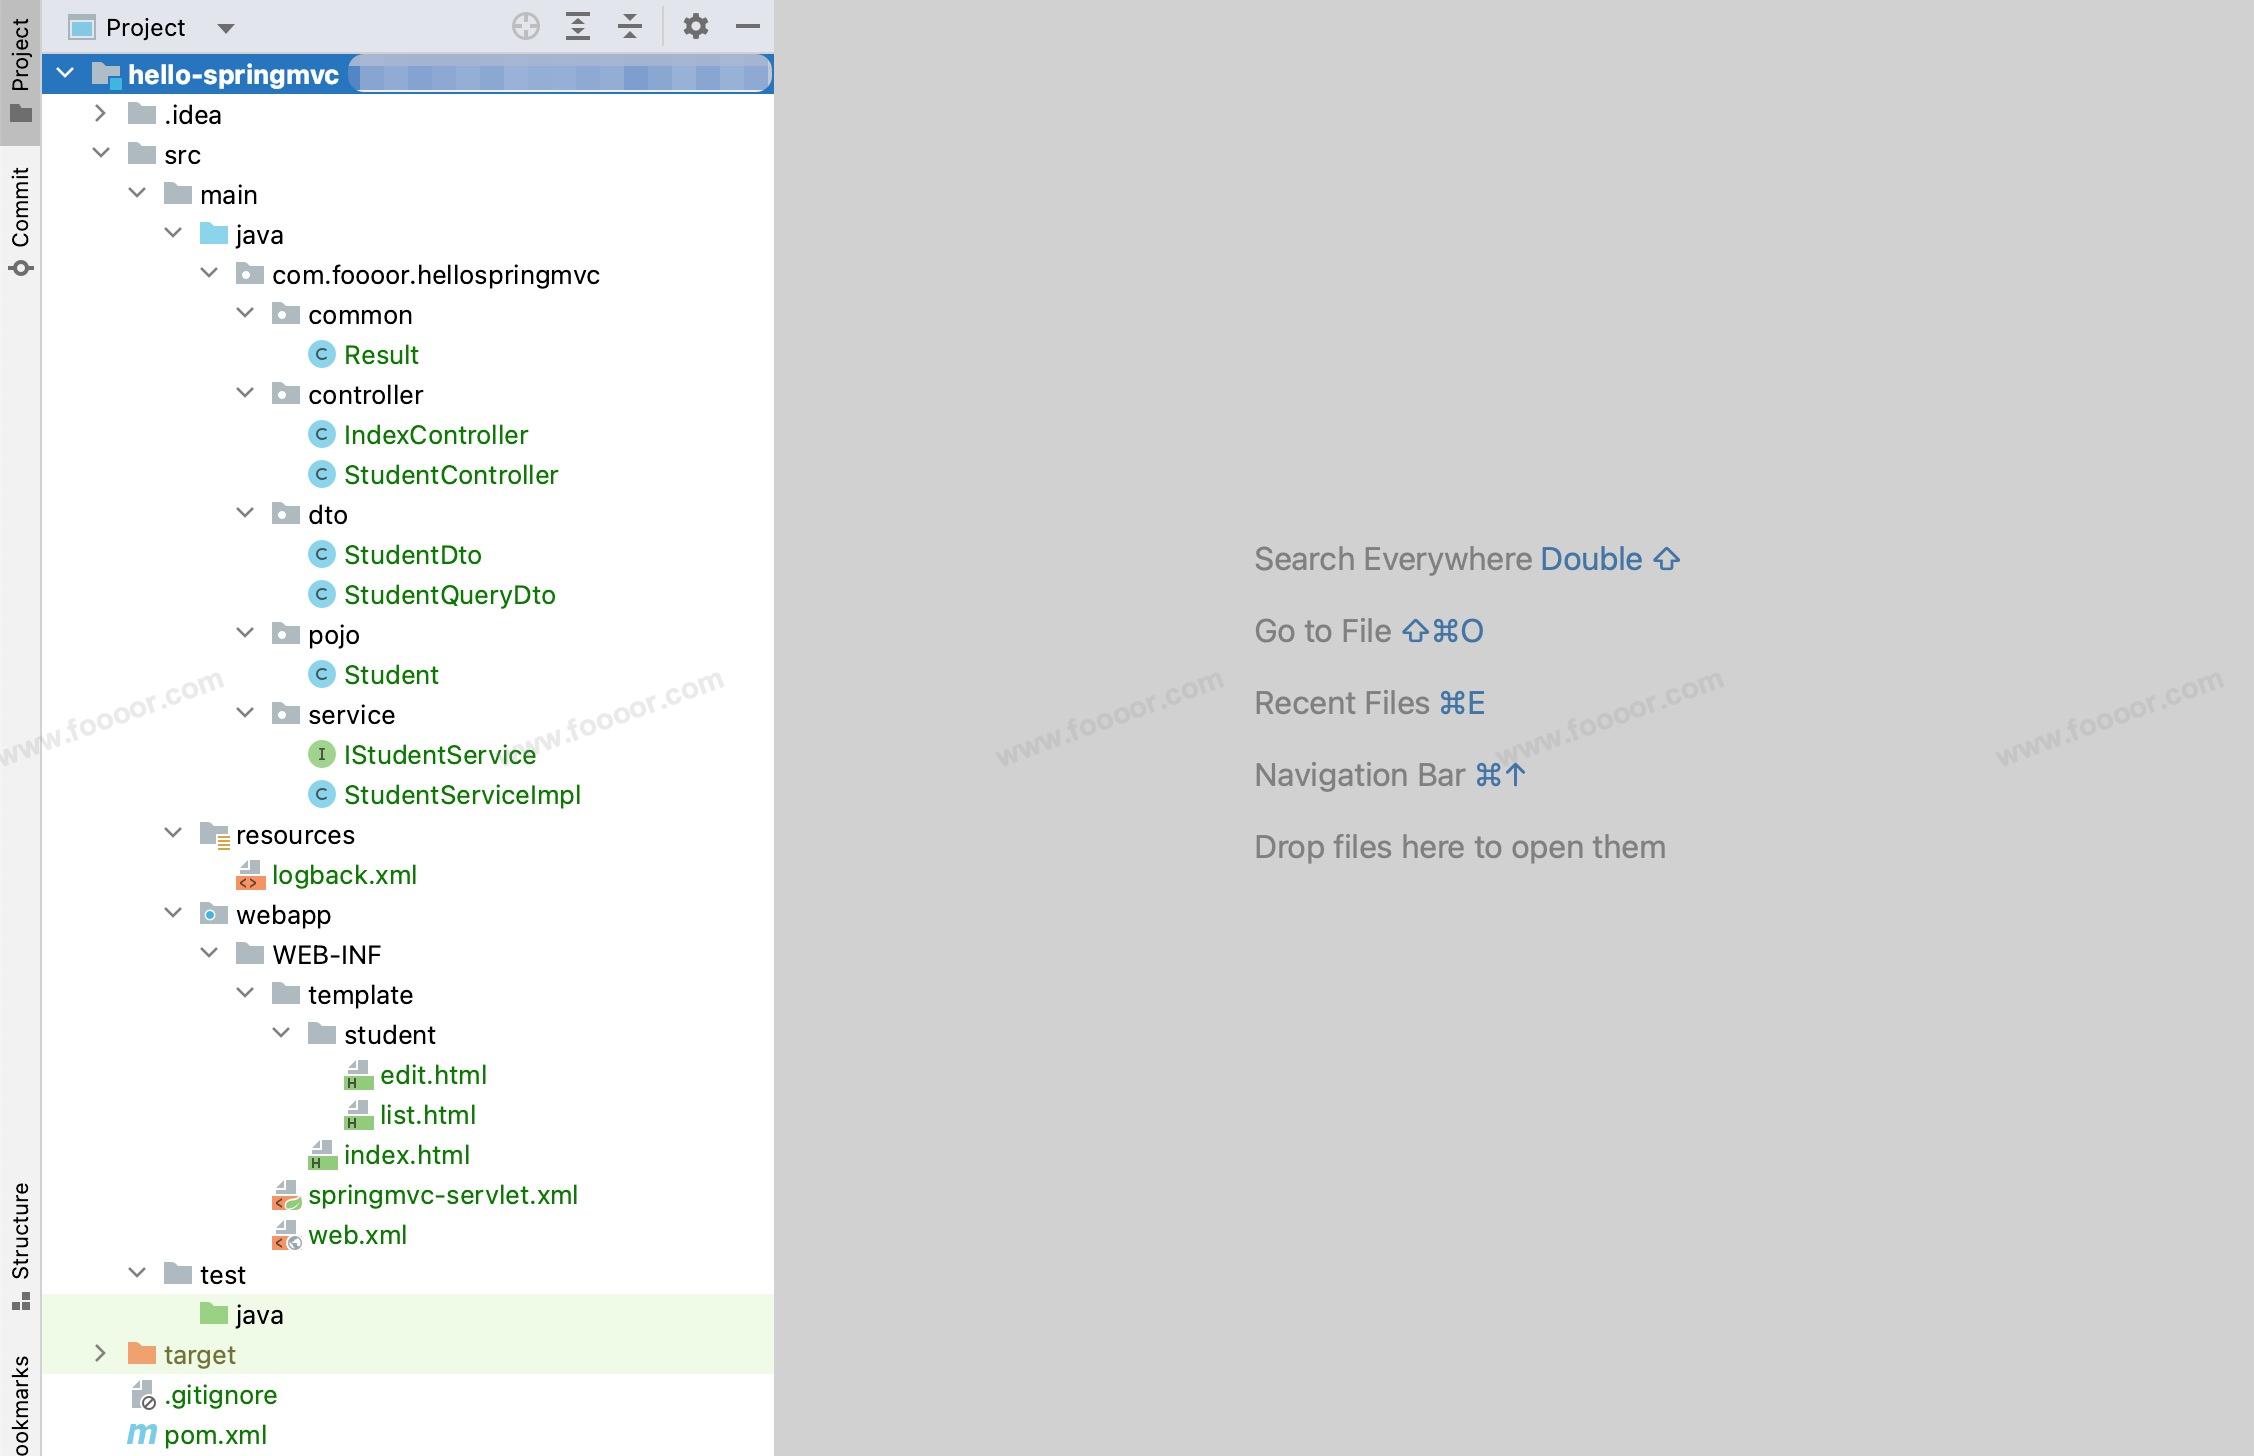
- 有的类是之前用到的。
7.3 实现Restful风格的CRUD
上面实现的 CRUD 就是非 Restful 风格的,一般在传统的 SpringMVC + Thymeleaf 项目中,更推荐使用非 Restful 风格的代码。
主要原因是 HTML form 表单只支持 GET 和 POST,如果要支持 Restful 风格,需要额外的处理,反而变的复杂。
下面就来介绍一下 Restful 风格的实现,在上面的 CRUD 的基础上修改。
1 修改Controller
主要修改 保存、更新和删除方法,修改接口url 并使用对应的方法来处理:
java
// 保存学生信息
@PostMapping
public String save(Student student) {
    log.info("新增学生:{}", student);

    studentService.save(student); // 新增
    return "redirect:/students";
}

// 更新学生信息
@PutMapping("/{id}")
public String update(@PathVariable("id") Long id, Student student) {
    log.info("更新学生:{}", student);

    student.setId(id);
    studentService.update(student); // 编辑
    return "redirect:/students";
}

// 删除学生
@DeleteMapping("/{id}")
public String delete(@PathVariable("id") Long id) {
    log.info("删除学生:{}", id);

    studentService.delete(id);
    return "redirect:/students";
}- 保存使用 post 方法、更新使用 put 方法,删除使用 delete 方法;
- 跳转到列表页面、创建和更新页面(同一个)的方法还是 get 方法。
2 添加过滤器
在项目的 web.xml 文件中添加 HiddenHttpMethodFilter 过滤器:
xml
<?xml version="1.0" encoding="UTF-8"?>
<web-app xmlns="https://jakarta.ee/xml/ns/jakartaee"
         xmlns:xsi="http://www.w3.org/2001/XMLSchema-instance"
         xsi:schemaLocation="https://jakarta.ee/xml/ns/jakartaee https://jakarta.ee/xml/ns/jakartaee/web-app_5_0.xsd"
         version="5.0">

    <!-- 其他配置 -->
    <!-- ... -->

    <!-- 可以把post请求转换为put/delete请求,需要在表单中添加 _method 隐藏字段 -->
    <filter>
        <filter-name>hiddenHttpMethodFilter</filter-name>
        <filter-class>org.springframework.web.filter.HiddenHttpMethodFilter</filter-class>
    </filter>

    <filter-mapping>
        <filter-name>hiddenHttpMethodFilter</filter-name>
        <url-pattern>/*</url-pattern>
    </filter-mapping>

</web-app>- 因为页面 form 表单的方法只支持 get 和 post,SpringMVC的
HiddenHttpMethodFilter过滤器可以将 post 请求转换为 put 和 delete 方法来处理,但是在页面的表单中,需要添加名称为_method的隐藏字段。
3 修改页面
首先修改编辑页面 edit.html :
html
<!-- 根据是否有id判断是新增还是编辑,使用不同的action url -->
<form th:action="${student.id} != null ? @{/students/{id}(id=${student.id})} : @{/students}" method="post" th:object="${student}">
  <!-- 当有id时,添加_method=put隐藏字段,用于转换为put请求 -->
  <input th:if="${student.id != null}" type="hidden" name="_method" value="put"/>

  <label>学号:</label>
  <input type="text" th:field="*{stuNo}" required>

  <label>姓名:</label>
  <input type="text" th:field="*{name}" required>

  <label>年龄:</label>
  <input type="number" th:field="*{age}" required>

  <button type="submit">保存</button>
</form>- 首先保存和更新是不同的接口了,所以根据是否有 id 设置表单的 action 是保存还是更新的接口;
- 在更新时候,需要在表单中添加
name="_method"的隐藏域,value="put",这样HiddenHttpMethodFilter过滤器才可以将 post 请求转为 put 请求进行处理。
然后修改列表页面 list.html ,因为删除方法也需要修改:
html
<!-- 表单提交删除,method需要使用post,并添加_method=delete隐藏字段,用于转换为delete请求 -->
<form th:action="@{/students/{id}(id=${u.id})}" method="post"
      onsubmit="return confirm('确定要删除该学生吗?');">
    <input type="hidden" name="_method" value="delete"/>
    <button type="submit">删除</button>
</form>- 修改删除按钮的表单,添加
name="_method" value="delete"隐藏字段。
可以测试了,经过修改, Controller 中提供的接口,就是 Restful 风格了,但是还是非 Restful 的风格方便一些。
内容未完......